nimi mute ni pi toki pona li lon. o pilin e ni.
Good news guys! The Ilo Nanpa project is completed! It's a calculator for Toki Pona numeral.
Media coverage:
Toki Pona is a minimalist constructed language invented by jan Sonja. It has less than 130 words. It has an obscure numbering system.
Unlike the numeral of most languages, Toki Pona Numeral is a not a base-10 numeral system. There're two numbering system in Toki Pona, they are the simple system and the complex system. Here's the simple one:
Obviously there's no point making a calculator for the simple system. Here's how the complex system work. It's similar to coin-counting. Numbers are made up by adding up existing numeral words as follows:
For example, 37 would be mute luka luka luka tu because 20+5+5+5+2 is 37.
This Ilo Nanpa calculator is designed for working with the complex numbering system of Toki Pona.
Ilo Nanpa has the following feature:
Ilo Nanpa has 16 LEDs, 9 push buttons, an en/weka (addition/subtraction) slider switch and a power slider switch. A photo of Ilo Nanpa is shown below:

The power slider switch can be used for switching between battery power and USB power. To power off the device, remove the USB and slide the slider switch to the USB position. Alternatively, remove a battery and slide the slider switch to the battery position.
As shown above, it has an LED for "weka anu ala" (negative or zero), an LED for "wan" (1), a couple LEDs for "tu" (2), three LEDs for "luka" (5), four LEDs for "mute" (20), an LED for "ali" (100), a couple of LEDs for "ali ali" (200), and a couple of LEDs for "ali ali ali ali ali" (500).
Reading the number is rather straight forward. You just add up the numbers of the lit LEDs and that's it. For example, if three "mute", two "luka", a "tu" and a "wan" lights up, that'd make "mute mute mute luka luka tu wan", which is 73. If an "ali ali ali ali ali", an "ali ali" and a "wan" lights up, that'd make "ali ali ali ali ali ali ali wan", which is 701.
If the displayed value is zero, only "weka anu ala" would be lit. For negative numbers, the shown LED would be the same as positive number, except that the LED "weka anu ala" would also be lit.
There're nine buttons (ala, wan, tu, luka, mute, ali, pana, kama, tenpo) and an en/weka (addition/subtraction) slider switch. They're used for operating Ilo Nanpa.
Resetting the value to zero - ala button
The "ala" button resets the current number to zero.
Performing Addition and Subtraction Operations - wan, tu, luka, mute, ali buttons
The buttons "wan", "tu", "luka", "mute", "ali" behaves in this way: When the slider switch is in "en" (addition) position, the button pressed would add its value to the current value. When the slider switch is in "weka" (subtraction) position, the current value would be subtracted from the value of the pressed button.
This design makes sense in Toki Pona numeral because, for example, when you're trying to add 31 to the current value, as 31 is "mute luka luka wan", you'd just slide the slider switch to "en" position and press "mute", then "luka", then "luka", then "wan". If you want to further add 3 to that number, you'd just press "tu" then "wan" after that. If you want to subtract a number from current value, you'd slide to "weka" position and type in the number with the buttons.
Saving and Loading Value - pana, kama buttons
The "pana" button saves the current value displayed on LED. The "kama" button behaves like the "wan", "tu", "luka", "mute" and "ali" buttons, except that it adds or subtracts the current value with the previously saved value depending on the slider position.
Multiplication can be performed by using "pana" and "kama" buttons. For example, if you want to compute 137x5, first you resets the value to zero using "ala". Then you slide the slider switch to "en" position. After that, you type in 137. Then you press "pana". Then you press "kama" four times, which is one time less than the desired multiplier. And you'd get "ali ali ali ali ali ali mute mute mute mute luka", which is 685.
The saved value of "pana" persists over power cycles.
Stopwatch and Timer - tenpo button
This is the most complicated function of Ilo Nanpa. For simplicity, let's consider only positive value for now. I'll cover negative value later.
After the "tenpo" button is pressed, Ilo Nanpa would enter timing mode. It adds or subtracts the current value by one for each second elapsed, depending on the position of en/weka slider when the timing mode started.
During timing mode: pressing "wan", "tu", "luka", "mute", "ali" and "kama" would have no effect. Pressing "tenpo" would leave timing mode without doing anything to the current value. Pressing "ala" would leave timing mode and reset the value to the one before entering timing mode. Pressing "pana" would save the current value without leaving timing mode.
If you're using Ilo Nanpa as a timer, it would be counting towards zero. When zero is reached, it would stop the timing and the "weka anu ala" LED would blink. The brightness of the LED would be higher than usual. Pressing either "tenpo" or "ala" would leave timing mode and reset the value to the one before entering timing mode. Pressing "pana" would save the current value, which is zero. Pressing all other buttons would have no effect.
If you're using Ilo Nanpa as a stopwatch, it would be counting towards the limit (i.e. 1600 for positive number). When the limit had reached, it would stop timing and the LEDs would show the limit value and blink. The brightness of the LEDs would be higher than usual. The behavior of all buttons are the same as the one during timing mode.
If timing mode is performed with a negative value, the value update would perform 20x faster, which means that the value would get updated for every 0.05 seconds instead of every 1 second. Other than that, the behavior are the same for positive and negative value.
UPDATE : some info in this section is outdated, including production time and the way to obtain a unit of this device. Please refer to this new blogpost for the updated info: Future Distribution of Ilo Nanpa with Time-Efficient Production Method
I'm interested in distributing this Ilo Nanpa device to Toki Pona speakers.
The material cost is cheap. It only costs around $5 for a unit, including shipping fee to my home. The shipping cost to the recipient would costs <$5. However, it takes me 2 hours to manually produce a unit of Ilo Nanpa, including soldering, flashing the program and quality control. That's a lot of work for producing each unit.
If you're interested in getting an Ilo Nanpa, please fill in the form in the official website of Ilo Nanpa. At this stage, I only offer this device to Toki Pona speakers. I'll personally verify if you're capable for written communication using Toki Pona by using the contact methods you provide in the form. I ask about how much you're willing to donate in the form. It's ok to fill in any amount. At this stage I mainly want to estimate the demand and the amount that the recipients are willing to donate. If you don't have any spare money, don't be ashamed to fill in 0 there. Just tell me your situation in the "sina wile toki e ijo ante, la o toki tawa mi kepeken lupa nimi ni:" text box and there's still a chance that you may get one. :) No commitment is needed to fill in the donation amount. It's understandable that one may change their mind on the amount to be donated. However, please do not deliberately lie because that would screw up my budget.
If you have the money, please kindly donate some to me as it takes a lot of time to develop and produce this device. The extra money will be used for sending units to those who're donating less, or who have no spare money to donate.
I'm not sure about the total demand of this device. If the demand is small (maybe less than 10 units), I'd be happy to manually produce the units as long as I can recover the shipping cost and material cost.
It'd be very embarrassing if the demand is between 10 units and 50 units. There's no way that I'd go for mass production, and it wouldn't be fair for me to do the work with zero labor cost. If the demand is somewhere in between 10~50 units, I'd like to get $40 for my two hours of work (shipping fee and material cost not included), which is quite expensive and I doubt anyone would be willing to spend this amount of money for this simple device. :( I don't know. Perhaps I could get another Toki Pona speaker to share the workload and help doing the soldering and send the device to other Toki Pona speakers. Of course, anyone doing that would get a share of donation for the units that they've soldered. Please contact me (Sadale) on the Toki Pona IRC channel if you're interested in helping.
If the demand is high (perhaps more 50 units), I'd possibly pay a PCB assembly to do that for me, maybe I can start a crowdfunding campaign for that. Anyway, it may not be easy to get a PCB assembly to produce this device. Unlike conventional electronic devices, this device uses unusual electronic designators. Conventionally, resistors are labeled as R1, R2, R3... Capacitors are C1, C2... LEDs or diodes are D1, D2... For this device, resistors are awen1, awen2... Capacitors are wawa1, wawa2... and LEDs are suno1, suno2... This can be a problem for PCB assembly to produce it. If I go for mass production, perhaps I have to do a bit of compromise on the designator names.
If you're interested in getting a development kit, and you're willing to cover the material and shipping fee, I'd be more than happy to send you one. That's because most of the time involved in distributing the device are spent on soldering. It'd be a good thing if you're willing to do that on your own. Of course, I'd even be happier if you're donating a bit extra for the development effort. :P Almost all components of the device are the SMD ones. Fortunately, most of them doesn't have small pitch. The only difficult part is the USB port having a pitch of around 0.65mm. The microcontroller is having a pitch of 1.27mm, which isn't difficult. Other than that, there're just a lot of 0603 components, some SMD buttons, a 3-pin male header, a battery holder and a couple of mini slider switches. They aren't difficult (to me :P) to solder at all. I'll also ship a programmer to you so that you can program the microcontroller.
The objective of this project is to experiment with working with low-end microcontroller. After some research, it's found that STM8S001J3 is one of the cheapest microcontroller in the market with a cost of only $0.2 per unit at a quantity of 10k. This microcontroller has nice amount of flash, RAM, EEPROM and peripheral. It has 8kB flash, 1kB RAM, 128 bytes EEPROM. Compared with microcontroller series like the ATTiny or the PIC ones, this one is both cheaper and better. The only shortcoming of this microcontroller I've found is the voltage range. It's a bit narrow compared with other low-end microcontrollers.
STM8S001J3 only has 8 pins, with 5 IO pins. They have another model that's a bit more expensive with 20 pins. I intentionally pick the 8 pins one to practice IO multiplexing.
Technical objective aside, this would probably be the first electronic device designed for Toki Pona language in mind.
The most interesting aspect of this project is that the microcontroller only has 5 IO pins, yet it's capable for interfacing with 16 LEDs, 9 push buttons and a slider switch. One of the 5 IO pins doesn't even have push-pull output capability. It makes the project even more challenging.
The schematics of the project is shown below. Click the image to open it in a new window:

Charlieplexing is a technique of multiplexing output pins for driving many LEDs with small number of pins.
Conventionally, an output pin can only have two states, they're either high or low. Pins on modern microcontroller often have one more state in addition of the two states, which is high-impedance state. In high-impedance state, the pin behaves as if it's disconnected from the circuit.
To perform Charlieplexing, one would list out all of the possible pin pairs of all available pins to be used for driving LEDs. For example, if I have 5 LED pins, A, B, C, D and E, the pin pairs would be AB, AC, AD, AE, BC, BD, BE, CD, CE and DE. After that, we connect two LEDs to each pin pairs. One of them is forward-biased. Another of them is reverse-biased. Since there're 10 pin pairs, 5 pins would be able to drive 10x2 = 20 LEDs.
To light up an LED, we'd set all irrelevant pin to high-impedance state, which "disconnects" the pins from the circuit. After that, we set a pin to high, another pin to low, then the desired LED would be lighted up. For example, if you wish to light up the reverse-biased LED connected to the AB pin pair, set pin C, D and E to high-impedance, then set pin B to high and pin A to low. Then the LED would light up.
For this particular microcontroller, one of the pins is not capable for high-sink output. It means that it is not possible to output the kind of high signal that's required for Charlieplexing. That would take away 4 LEDs. Therefore, this device has 16 LEDs instead of 20 LEDs.
For this device, one LED is lighted up at a time. Then it switches to another one. This continues and repeats. At high switching frequency, it gives the user an illusion of multiple LEDs being lit at the same time.
The input buttons are multiplexed using voltage divider. There're 9 buttons and a slider switch.
The slider switch is attached to a dedicated pin. One of its position is connected to Vcc via a 470k resistor. Another of them is connected to ground via a 470k resistor. A high resistance is chosen to minimize the interference with the LED circuit.
For the 9 buttons, they're divided into three groups. Each group is having three buttons. The first group is ala-wan-tu. The second group is luka-mute-ali. The third group is pana-kama-tenpo. Each group is connected to an ADC pin of the microcontroller.
The microcontroller has two pins connected to ADC out of the box. To connect the third pin to ADC, an option byte has to be programmed. With three ADC-capable pins, we can have three button groups each handling three buttons.
Each ADC pin is pulled down by a 470k resistor. A high value resistor is chosen so that it would minimize the interference with the LED circuit. When a button is pressed, the ADC pin is parallelly connected to Vcc via a 10k (ala/luka/pana), 10k+20k (wan/mute/kama), or 10k+20k+20k (tu/ali/tenpo) resistors. Holding any button would cause the Vcc resistor and the pull down resistor to form a voltage divider. The reading of the voltage divider is fed to the ADC pin of the button group. The value chosen on the Vcc side is significantly lower than the pull-down side because there's a limit of input impedance of the microcontroller. If the is input impedance is too high, the ADC wouldn't work.
Is it alright to share the same IO pin for both input and output? Yes, it is. But it's more complicated than I thought. I ran into a few issues due to the sharing of input and output pins.
Button Detection Issue
I thought that the ADC reading for each button group would simply be a voltage divider as long as I've set all output pins to high impedance state. For example, pressing "ala" would makes the ADC reading to be MAX_ADC_VALUE x 10k/(470k+10k), pressing "wan" would be MAX_ADC_VALUE x 30k/(470k+30k) and pressing "tu" would be MAX_ADC_VALUE x 50k/(470k+50k). I was mistaken.
This thought is wrong because it doesn't consider that the input pins and the output pins are sharing the same pin. It means that when a button is pressed, the Vcc connected to the 10k/30k/50k resistor would get to the ground via both the pull-down resistor of its own button group and other button groups via the Charlieplexed LED network. That's because the Charlieplexed LED network is connected to all button groups, which is pulled down to the ground. In addition, the en/weka slider is also connected to the Charlieplexed LED network. All of these would affect the ADC reading.
Due to manufacturing tolerance, the forward voltage of each LED on the Charlieplexed LED is not known. Therefore, there's no easy way to calculate the value of ADC reading when a button is pressed. For this reason, I've included ADC reading calibration mechanism in the factory mode of the firmware.
The ADC calibration scene would require the user to press a button. It records the ADC reading of the button. The operator is required to press each of the buttons for a few times. The ADC readings of each button press are averaged out and the ADC threshold values for each button are calculated and they're saved to the EEPROM of the microcontroller. After the calibration, the microcontroller is ready for detecting button presses.
It's empirically determined that the effects of holding buttons of other button groups is negligible to the ADC reading. However, the en/weka slider does have substantial effect to the ADC reading. For this reason the ADC reading calibration are to be performed for both "en" slider position and "weka" slider position.
en/weka Slider Detection Issue
Unlike other buttons, this slider is connected to either Vcc or Ground via a 470k resistor. As the resistance is high, lighting up any LED or pressing any button would affect the detection of en/weka slider for a while. For this reason, the firmware is designed in a way that it won't perform en/weka detection when any button is held. It also stops lighting up the LEDs for a short time once a while for detection of en/weka slider position.
LED display issue
Holding a button would connect Vcc to the LED network with a resistance of 10k/30k/50k. That causes some LEDs to light up.
As a workaround, a model of LED with lower brightness is chosen. It's empirically found that the one with lower brightness is less vulnerable to this issue. With this kind of LED, the brightness caused by pressing button is far lower than the LEDs lit by the display of number. Therefore, it wouldn't be a problem for normal operation at all.
Way to Go!
Since all these issues have got a solution, there isn't a problem anymore. The device works with input and output pins multiplexed! I managed to get 5 IO pins to control 16 LEDs plus 9 buttons plus a slider switch! :D
Factory mode can perform ADC reading calibration as mentioned above. In addition of that, it's possible to perform key press tests and LED brightness adjustment using this mode.
To enter factory mode, hold down "ala" on power up for 5 seconds. After that, three "mute" LEDs and the "ali" LED would light up. It means that the device is now in password mode. By pushing the correct button sequence, the user would enter factory mode. If the user had typed in a wrong button sequence, he'd be led to normal mode. This design is to prevent unintentional access of factory mode. That's because if the user had mistakenly entered factory mode, he could screw up the ADC calibration values, which would break the button detection mechanism of the device until a proper recalibration.
Please refer to the README file of official Github repository of Ilo Nanpa for understanding how to work with factory mode.
Since we've got a low pin count microcontroller, we couldn't dedicate a pin for programming and debugging. The programming pin shares the same IO pin as luka-mute-ali button group and a few LEDs. This is a problem because we need a mechanism to reprogram the microcontroller in case it's needed.
To get the microcontroller to stay in programming mode, hold "pana" key on power up. As long as the button is held, the device would stay in programming mode. Once it's release, it'd enter normal operation mode.
The pana-kama-tenpo button group is intentionally chosen as the programming button. That's because it's a bad idea to pick any other button groups. The luka-mute-ali button group is shared with the programming pin, which means that holding only of these buttons may affect the signal of programming pin. The ADC of ala-wan-tu button group is only available after the option bytes are programmed. In case the engineer had forgot to program the option bytes, the button press of ala-wan-tu wouldn't get detected. That would cause the microcontroller to get locked up and it wouldn't be possible to reprogram it anymore.
Since using any of the other button groups is a bad idea, the pana-kama-tenpo group is chosen as the programming button group.
Let's not worry about debugging. It just isn't possible to spare a pin for debugging, unfortunately.
By the way, when I was trying to implement this mode, I screwed up a few times and permanently locked up a couple of microcontrollers. I had to throw them away and solder a new microcontroller onto the PCB. :(
This is the second PCB I've designed. The first one was for ilo musi (the game console that I had been developing). In fact, the third prototype of ilo musi is mostly completed. It's soldered on a PCB. I've never got the time to blog about it, tho.
The PCB was designed using KiCad. I use it mainly because it's free. As a bonus, it's open source. :)
The PCB of Ilo Nanpa is 50mmx50mm. I keep it small because some PCB fab offers a cheaper price for 50mmx50mm boards. I ordered 10 boards for $4 (shipping fee not included), and somehow they delivered 18 boards to me. :D
The PCB is a double layer one. There's a layer on the frontside of the board and another layer on the backside.
Other than that, there's nothing very interesting about the PCB of this project.
I've learned quite a lot from this Ilo Nanpa project, including:
This is also my first completed electronic project having a PCB! :)
Now the Ilo Nanpa project is officially completed. All I need to do is to distribute the device. :)
I'll continue to work on ilo musi, which is the game console project that I had been working on and blogging about. See you!
Hey guys! I've developed a game in 48 hours for the game console that I have been working on lately!
The following Youtube video contains all of the info about the gameplay as well as a bit info about how this game were made. Please do watch it! :)
Links: Source code (Github) | Alakajam Entry Page
It isn't possible to develop a game within 48 hours without any preparation work. Therefore, I did spend quite a bit of time on preparing it. The preparation includes:
I wish I could get a third party to review this game. Unfortunately, it isn't possible for anyone else to play this game for now because the game console isn't released yet. So here's my self-review of this game.
As a game developed within 48 hours, I'm rather satisfied with the result. Thanks to my preparation work as well as my previous experience on game jams, I'm able to finish this game on time.
The game is rather challenging and well-balanced. The game is made interesting by having the player keeps try picking up coins. That's the only way to score in the game. For each coin the player had picked up, the game gets a little bit more difficult until the player couldn't hang in there and lose the game. With randomization of various elements in the game, including the spawn rate of conveyors and hostile entities, the position of the objects, etc. The difficulty of the game is partly based on the luck of the player. That makes it a fun game for players with any level of gaming skill.
For the program of the game, it's rather sad that there's quite a bit of code duplication in the game. That's partly because I'm on a memory-constrained system. Another reason is that there's a time limit for the jam. Anyway, the game jam had ended. I'm not going to fix that. :P
This game demonstrates that the game console I'm developing is capable for running games! It shows the system API of the game console is good enough for game development. Therefore, I am able to move forward to further develop this game console. In the future, this game console might become an alternative to PICO8 for game jams participants.
I'm sorry that I didn't update about the progress of the development of the game console for a while. A lot of progress were being made lately!
The second prototype of the game console is ready! It's soldered on a perfboard. There're a few upgrades made in this new prototype. Here's the specs of the second prototype:
left, right, up, down, button 1 and button 2The PCB to be designed will be based on this second prototype.
Despite that I had professional experience in embedded programming, I'm rather green. Therefore, I've discussed with some veterans in embedded programming about the design of this game console. Since this game console works by loading the game from SD card to the internal flash of the microcontroller by self-flashing, they immediately pointed out that performing frequent self-flashing would wear off the flash of the game console quickly.
I've checked the datasheet of STM32F030K6T6. The guaranteed number of flash write cycles is merely 1000 cycles. That's a little bit small and it will cause problem to our game console. Interestingly, the 1000 number of write cycles is "Guaranteed by design, not tested in production". For other microcontrollers produced by STMicroelectronics, the number of write cycles is often 10000 and it's "Guaranteed based on test during characterization".
It just doesn't make much sense to have this little number of write cycles. Here're some theories I have about the number:
In long run, maybe I should do my own research on figuring out the actual number of flash write cycles of the microcontroller I'm using. I refuse to believe that the write cycle is 1000 cycles in room temperature. If the write cycle is like 3000 cycles, it's kinda acceptable because that'd mean that the user can load 10 games every single day for 300 days until the game console breaks. And I doubt that there's such an enthusiastic player of this game console anyway. But 1000 cycles is really a bit too little.
To reduce the number of flash write cycles, I've modified the bootloader firmware so that it only perform flash erase and rewrite if the source ROM on SD card is different from the previousy self-flashed game inside the microcontroller flash. That would cause self-flashing not to be performed if the same game is launched again after a reboot. This should help reducing the flash writes by quite a bit, especially if the player is repeatedly playing the same game over and over again.
Another issue that those professionals pointed out was the Game Flash and RAM Offset. They raised an interesting idea about the offset of Flash and RAM.
In the past, I designed the Flash and RAM layout like this:
There's a huge problem with this design. For the flash, if I ever update the firmware and the size of the firmware got increased, that would cause the offset of the Game Flash to be changed. That'd require the game to be rebuilt to work on the newer version of the game console. The same issue goes for the RAM.
Therefore, I've modified the layout. Now it looks like this:
For the Game RAM, I put the bootloader-exclusive RAM at the end. This design allows the bootloader RAM to expand without changing the origin offset of the Game RAM. In addition, if I ever upgrade to a microcontroller with more RAM, the entire RAM space would be expanded. And I would push the Bootloader RAM to the end of the RAM, and the Game RAM space would also be expanded. Since the origin of the Game RAM remains unchanged, I can still run the game that's built for the pre-upgrade version of the game console.
The same story goes for the flash. However, it's a bit more tricky because I need the bootloader to take the first sector of the Flash. That's because the first sector contains the interrupt vector and boot-related stuffs. I have to take the first sector so that the bootloader would be loaded on power up instead of the previously flashed game. Other than the first sector, the remaining part of the bootloader is put at the end of the flash space. That brings us the same advantage of putting the bootloader-exclusive RAM to the end.
This thing was done long time ago. But I've been too busy to blog about it. In the past, we made something called EXTIF to allow the game to call the functions located in bootloader by using a software interrupt, just like how BIOS work. It turns out that this design is utterly dumb because there's a function calling convention for ARM. It's called Procedure Call Standard for the ARM Architecture(AAPCS). As it's the go-to standard for functions compiled for ARM microcontrollers, it's possible to call any functions compiled by any compiler with any amount of parameters as long as you have the address of the functions.
For this reason, I just made a veneer on a fixed address for each of the system API functions. The veneer redirects the function call to the actual address of the function inside the bootloader. To call the system API function, the game declares all of the system API functions available in the bootloader and assign those fixed addresses of the veneer to the function declarations. With GCC, it's possible to map a function to an address by using the --just-symbols parameter when you invoke the linker.
The latest bootloader firmware is able to redirect almost all of the interrupts of the microcontroller to the Game ROM. A veneer interrupt handler were used for calling the interrupt handlers in the Game ROM. That enables the game developers of this game console to perform low-level programming. Along with the high level API inside the bootloader, this game console allows its game developers to learn about both higher level programming and low-level programming.
Here I've managed to complete the 4th Alakajam by developing a game for my game console. :)
Now that the firmware of the game console is ready. The next step of the development of this game console project is to design the PCB. After that, perhaps I'll also draw a case for the game console. If I have the time, perhaps I'd also develop an emulator for it. Since the microcontroller behind this game console is an ARM one, it should be possible to modify a Gameboy emulator for running games developed for this game console.
Just as I planned, I expect this project should be completed some time in 2019. Maybe the emulator would be available in 2020 if I end up working on one.
That's it for this blogpost. I'll update you guys soon! :)
As of 15th Oct 2018, I'm currently in between jobs. I was an embedded programmer of thermostats with a bit more than a year of experience. I did firmware development, Python automation scripts as well as tools for internal use, including setting up MQTT server and web server on a Raspberry Pi. In addition of that, I have been a hobbyist programmer for 9 years since I was back in middle school. Currently I plan to learn further about Python and modern web development technologies, mainly the back-end and devops ones. Then I'll start actively looking for another job. I prefer to go for a remote-working job. It can be full-time, part-time or freelancing.
If you're looking for someone to fill in any sort of programming-related positions, feel free to contact me via "hire dot me at sadale dot net". Alternatively, you can look for me on Freenode for having informal conversation with me. My nickname is "Sadale" there. Keep in mind that you have to identify (i.e. login) on Freenode in order to PM me. That's a new policy of Freenode to deal with the recent IRC spambots.
As I've mentioned in my previous blogpost, the clock control mechanism were implemented. But I've been too busy to blog about that. Now I've got a moment to do a write-up of the game console project about that.
The microcontroller STM32F030F4P6 is capable for running at 48Mhz. The 48Mhz system clock is generated from 8Mhz HSI clock. It's multiplied with PLL by up to 12 to generate a system clock of up to 48Mhz.
The game console will be battery-powered. Power consumption is critical to the battery life. To minimize the power consumption, we allow the game to enter sleep mode. With frame limiting, it's highly probable for the game to have some idle time before it is required to process the next frame. During that period of time, the game would enter sleep more to save power. Of course we'd disable the PLL in sleep mode to further reduce the power consumption. And that'd cause the system clock to be limited to 8Mhz when it's sleeping.
And here's a problem. There're many clocks derived from the system clock in the microcontroller. Most of them aren't very time-critical. However, for sound generation, timing is very important. Otherwise the sound generated would be distorted.
There're two causes of sound distortion. One is the selection of using, or not using PLL. Another is modification of timer prescaler. It's empirically determined that the sound distortion caused by toggling the state of usage of PLL is negligible. However, changing the timer prescaler does affect the sound quality for quite a bit.
Since changing the timer prescaler would affect the sound quality, we'd want to avoid that. Unfortunately, if we want to preserve the value of the timer prescaler, and if we still want to enter sleep mode to save power, the maximum possible clock would be limited 32Mhz instead of 48Mhz.
Here's the reason behind it: The timer clock can be calculated with this (overly simplified) equation:
(timer clock) = (system clock) / (APB1 prescaler [including the x2 mechanism]) / (timer prescaler + 1)
Timer clock has to be a multiple of 8. APB1 prescaler has to be power of two. Timer prescaler can be any integer.
Since we need to enter sleep mode, we have to set the system clock to 8Mhz at some point of the program. Let's assume that we set the APB1 prescaler=1 and timer prescaler=3 at 8Mhz. So (timer clock) = 8Mhz / 1 / (3+1) = 2Mhz.
If we want to maintain the same timer clock without changing the timer prescale at 32Mhz, we could easily do that by just changing the APB1 prescaler to 4. So we get (timer clock) = 32Mhz / 4 / (3+1) = 2Mhz, that's still 2Mhz. Therefore, the sound quality would be good at 32Mhz.
However, things get tricky if we want to maintain the same timer clock as 8Mhz at 48Mhz. If we aren't changing the timer prescaler, we'd need to pick APB1 prescaler=6. However, APB1 prescaler has to be a power of two. So it has to be rounded to APB1 prescaler=8. Then we'd be forced to change the timer prescaler from 3 to 2 in order to maintain the timer clock. So we get (timer clock) = 48Mhz / 8 / (2+1) = 2Mhz. However, the switching of timer prescaler will cause noticable sound distortion as shown below:
32Mhz without frame limiting, no sound distortion:
32Mhz with frame limiting, negligible sound distortion:
48Mhz without frame limiting, no sound distortion:
48Mhz with frame limiting, noticable sound distortion:
Our solution is to let the game itself decide to use 32Mhz or 48Mhz clock. If the game prefers higher sound quality, then it should stick with 32Mhz. If it wants performance, it should choose 48Mhz. If the game has sound, it's recommended to use 32Mhz as possible and switch to 48Mhz only when doing computation-intensive stuffs.
I've made a minimalist breakout game. At clock rate of 32Mhz without frame-limiting, it can achieve 40fps with around 80 bricks, and 250fps with no bricks. The recommended fps is 8~10fps because of the hardware limitation of the update rate of LCD. Since the max fps is much higher than the target fps, the game console can save quite a lot of power by doing the frame-limiting to 8~10fps with the use of sleep mode. :)
It's very simple. There's just one API call that modifies the clock system. That's:
If wakeUpToBoostMode is true, it'd enter 48Mhz mode after the end of the sleep. Otherwise that'd be 32Mhz.
And it has a few other API calls for querying the status of the clock system:
Clock Control System is mainly used for frame-limiting and saving power. In the game, there's a main loop. The game should call systemSleep() after the end of processing of each frame.
Here's the typical usage inside the main loop:
The following features were implemented. But I'm saving them for the coming blogpost:
I'll be working on the following stuffs:
Stay tuned. I'll make another blogpost soon! :)
toki! ni li nimi mute mi pi nanpa wan pi toki pona lon lipu mi. tenpo suno ni la mi pana e kalama musi "mi ken ala moli e pipi" tawa jan ali a! tenpo suno luka tu wan la mi pali e kalama musi e sitelen tawa. tenpo pi mute wan la mi pali e sitelen tawa a!
tenpo pini pi tenpo sike ni la mi pali e kalama musi mute tan tenpo "Global Game Jam 2018". kalama musi wan pi ona mute li pona mute tawa mi. mi pona e kalama musi ni li pali e sitelen tawa pi kalama musi ni li pana e sitelen tawa ni tawa jan ali.
tenpo pini la mi pali e kalama musi. taso mi pana ala e ijo ni tawa jan ali. jan jo ala e ijo ni la ona li ken ala ante e kalama musi.
tenpo ni la mi pana e ijo ni pi kalama musi tawa jan ali a! sina ken ante e kalama musi ni.
Hey guys! Today I'm releasing a toki pona song "Futile Attempt of Killing Mosquito" along with an animation. I've spent 8 days and nights on this piece of music and its animation! It's also my first serious animation project in my life!
This music came from Global Game Jam 2018. I decided to be a musical guy for the event. So I've made quite a few pieces of music as a practice. That's because we're required to get the work done within 48 hours in the event. So I have to get familiar with the tools. A few months after the event, I found that I love one of those musical segment particularly. Then I elaborate this part and enhance it and I've made an animation for it. And here we have this musical animation.
Unlike my previous music, this time I'm providing source files of music publicly and direct download link to a few variants of its animation. That makes remixing and editing the music and animation much easier compared with my previous works!
o lukin e sitelen tawa ni pi kalama musi lon lipu Jutu!
Check out this musical animation on Youtube!
[o kute e ni! | Click here to listen to it]
sina ante e sitelen tawa e kalama musi la o toki e mi. ona li pona la mi wile pana e lupa pi pali sina lon lipu ni a!
If you distribute a remix of any resources from this project, feel free to inform me. If it's a good one I'd be happy to put up a link to your work right in this blogpost!
lipu lawa pi "CC BY 4.0" li lawa e sina la sina ken kama jo e ijo lon sewi lipu.
License of the resources above: CC BY 4.0. Please attribute to this blog post or sadale.net. If you do not want to do the attribution, please contact me and let me know what you're going to use these resource for. It's very likely that I'll grant you attribution exemption.
sina wile ante e kalama uta la o kepeken e ijo "kalama musi" anu "kalama musi pi kalama uta". sina pini kalama uta la o kama jo e ijo "kalama musi weka kalama uta" kepeken ilo sona kalama. ilo sona kalama li ilo "Audacity" anu ijo ante. ijo "kalama musi weka kalama uta" en kalama uta sina li kalama musi pi kalama uta sina.
sina ken kalama uta e nimi mute pi kalama musi ni kepeken toki ante a!
If you want to do vocal swap, first, download the resource "Music" or "Vocal Assist". While playing any of these, sing along and record what you're singing. Then download "Instrumental Music" and align your recording to the Instrumental Music track with software like Audacity. Then you've got your voice into this piece of music.
With vocal swap, you can even sing this song in another language!
sina wile ante e nimi toki la sina ken kama jo e ijo "sitelen tawa weka nimi Inli" e ijo "nimi pi toki Inli pi sitelen tawa". sina pini ante e ijo "nimi pi toki Inli pi sitelen tawa" kepeken ilo "Aegisub" la sina ken pali e sitelen tawa sin kepeken e ilo "FFMPEG" anu ilo ante. sina jo e sitelen tawa pi nimi pi toki ante a!
sina pana e ijo tan "Aegisub" tawa sitelen tawa lon Jutu la jan ali li ken lukin e nimi pi toki sina a!
If you want to modify the subtitles of the vid, download the resource "Animation without English Subtitles" and "SubStation Alpha English subtitles". Modify the resource "SubStation Alpha English subtitles" with software like Aegisub. With FFMPEG, you can combine the subtitles and the video. Then you get a video with subtitles in another language.
If you provide that subtitles file to the video hosted on Youtube above, other users can view your subtitles.
nasin nanpa wan li ni: sina wile kepeken e ilo "LMMS". o kama jo e ijo "ijo pi kalama musi pi ilo "LMMS"". sina pini lukin e nimi mute lon ona la o kama jo e "kalama uta". tenpo ni la sina ken ante e kalama musi ni.
nasin nanpa tu li ni: sina kama jo e ijo "kalama musi" e ijo "kalama musi weka kalama uta" e ijo "kalama musi pi kalama uta". sina namako e kalama musi ni kepeken ilo sona kalama.
There're two ways to do remix. The first way is to use LMMS to remix the music. Download the resource "LMMS Music Project Source File". Follow the instruction in the file and download "Vocal (for LMMS)". Then you can modify the music right inside LMMS.
Another way is to use other audio tools. After downloading the resources "Music", "Instrumental Music" and "Vocal", you can do operation on the audio to remix it. For example, one can add some drum and stuffs to it, or add some effects to it like adding filters or reverb effect or pitch change or something like that. Just do whatever you want with them!
nimi mute pi kalama musi ni li toki pona. :P
It's Toki Pona. It's a minimalist, constructed language invented by jan Sonja. The entire language is made of 123 words! It's rather easy to get fluent on it. I learned this language like two or three months ago. It took me like a month to learn it.
Long time ago I've attempted learning another constructed language Esperanto. I didn't have much success. Mainly because it really takes a bit of time to learn those vocabularies. I had to look up the dictionary from time to time. But Toki Pona's different. Once I learn all those 123 words, it isn't that difficult to understand any Toki Pona text and conversations. Even if I don't completely understand it, at least I'd have an idea on what it's about because I understand every single word. It's just that I don't understand the combination of words.
If you've nothing to do and interested in learning a useless language, Toki Pona is the language to go! Toki Pona community does exist. It's a bit small, tho. Still, it's rather fun to chat in a language that others couldn't understand. That's how do you talk shit about others without drawing any unwanted attention! :P
nimi mute li pona lili. sitelen lukin li pona mute. o lukin e sitelen ni:
A image's worth thousands of words. Take a look on this pic for an overview of how this vid were made:

mi kepeken e ilo mute a! mi wile ala toki e ilo ali. mi toki e musi ona.
I'll not go thru all of the software above. I'll just cover the interesting parts.
mi pali e kalama lili kepeken e ilo "Palette MCT". mi wile kepeken e ilo "Wine" lon ilo "Linux" tan ni: ilo "Linux" li ken ala kepeken e ilo "Palette MCT".
I made the melody and chord with Palette MCT. It's a great free tool for doing chord progression and designing melody. Since I lack knowledge on music theory about chord and stuffs, this tool is very helpful to me. Previously I did chord progression by trial and error. I adjusts each note tediously until I find the one that sounds right. With this software, it helps me to filter out those inappropriate chord immediately. Then I can focus on the one that sounds good.
Unfortunately, it doesn't support linux. I had to run it on wine. And it's the only non-FOSS tool I've used for this project.

As you see, there're those musical notes. The pink notes are non-chord notes. The black ones are the chord ones. And the colored rectangles with letters and numbers are the chord chosen for the measure.
This part was done before Global Game Jam 2018. Once again, this music is a enhancement of a piece of music made during my practice for the jam. :P
mi pali e sitelen kepeken ilo "Inkscape". ilo "Inkscape" pana e sitelen, tawa ilo "Synfig". mi pali e sitelen tawa kepeken e ilo "Synfig". mi kama sona e ilo ni kepeken tenpo suno wan kepeken sitelen tawa ni: [sitelen tawa "How to create animation in Synfig (3rd edition)"]. ona li pona mute.
I made the graphic with Inkscape. Then it's imported to Synfig and turned into animation. I learned its basic within a day using this video course: [How to create animation in Synfig (3rd edition)]. Synfig itself is free. But the video course isn't. Still, it's very affordable. If you're interested in learning it and cannot afford it, I'd be happy to buy a copy for you.

ilo "Synfig" li pona. taso tenpo mute la mi pali e sitelen tawa kepeken ona. mi pini pali la ona li pali e sitelen tawa kepeken tenpo mute mute.
Synfig is a great piece of FOSS animation tool. It's easy to use. But it's rather time consuming to make animation with it. After making the animation, it also takes quite a bit of time to render, especially for video that uses the "Curve Warp Layer". It takes an hour and half to render an animation with like 500 frames on my Bay Trail Pentium laptop. The Curve Warp Layer was used to make the swinging arm animation in our video.
mi pini pali e sitelen tawa ni la mi pali e ilo sona musi.
pali pi sitelen tawa li pona tawa mi. pali ni li musi. taso mi pali e ona kepeken tenpo mute mute. mi jo e tenpo sin la mi wile pali sitelen tawa sin.
The completion of this video marks the end of the break of my Portable Game Console Project. I'll get back to that project soon.
I enjoyed making this animation. The catch is that it takes far too much time to make one. I'll make another one in the future if I have the time.
The graphic system of the portable game console project is implemented! In addition, the clock control and power saving stuffs are also implemented. This blog post focus on Graphic System. I'll save other stuffs for my next blog post.
Double buffering isn't used in this procedure:
I've modified the sample program that I made for testing storage system, input system and synth system. Now that it's also capable for testing the new graphic system!
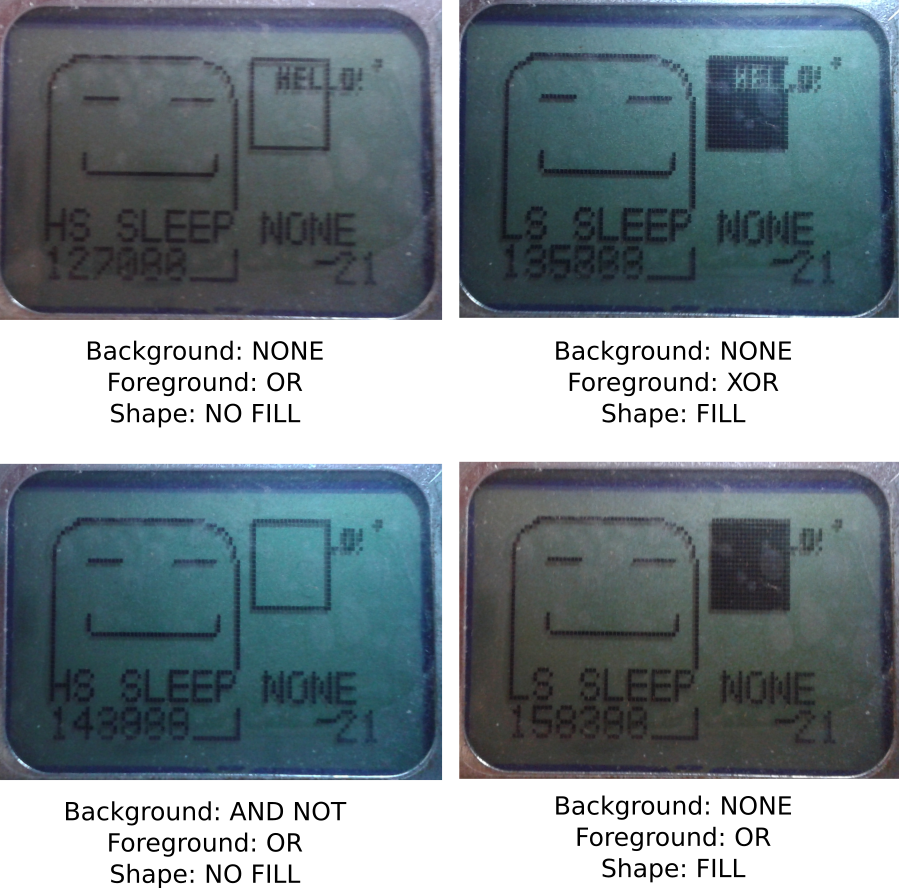
The updated sample program draws a lot of stuffs on the LCD, including a background image loaded from a resource in the ROM, a square, and system information like system tick, clock frequency and sleep mode.
In the updated sample program, the drawing mode of the square can be configured. Here's a few photo comparing some of the available the drawing modes:
Due to flash space constraint, some graphical features were removed. They include ellipse, triangle, line and dot drawing support. :(
We have 16kB of flash in total. Currently the bootloader and library takes 10kB, which is taking more space than the originally planned 8kB. It'd be even worse if these features were enabled. :(
Fortunately, it's still possible to draw those shapes by implementing the drawing function in the game itself.
I've already implemented the following features. However, these features deserve another blog post. I'll blog about them later.
I'll be working on the following stuffs:
That's it for now. I'll update you guys for any progress! :)
And I guess I'm going to take a short break from this project. I'm going to work on a piece of music!