
Toki Pona is a constructed language invented by jan Sonja that has hundreds of speakers around the world. Today marks the 20th Anniversary of Toki Pona language. In celebration of the birthday of the language, the ma pona pi toki pona community had organized Toki Pona Day 2021.
As a toki pona speaker, I'm very glad to be taking part in the event as a performer, as one of the sponsors and as a participant!
A month ago, I was contacted by "kala Tonyu" that I was requested to perform in "suno pi toki pona 2021" for the toki pona content that I've contributed to the internet, including ilo nanpa and the pipi song.
After some thoughts, I decided to make a sequel of the toki pona calculator, ilo nanpa lili. It's a simplified ilo nanpa that you can build on your own. It's a CD4017B-based counting device that can be built on breadboard. So I've made an assembly video, assembly instruction manual, BOM and website for the device for the event. Unlike ilo nanpa, this ilo nanpa lili is sold as a kit that the end-user would have to assemble it on their own. And it'll be sold at cost price.
The assembly video was premiered on Youtube during the event. Here's the video:
And here's the website of ilo nanpa lili that contains the BOM and shipment arrangement, so that everyone could get the kit or source the components on their own to build ilo nanpa lili.
In addition of being a performer, I was contacted by the event organizer for a request of sponsoring a unit of ilo nanpa for the event, which I gladly accepted.
In the same lucky draw, it also contained 3 units of the official toki pona book, which's known as "pu", as well as 3 units of the official toki pona dictionary, which's known as "ku". The sponsors of these items are anonymous, so I've no idea on who donated them.
Anyway, the winner of ilo nanpa in this lucky draw is jan Seno. Congratulations! I look forward to packing and sending the free unit of ilo nanpa to you!
Here comes to the most important part. In addition of being a performer and a sponsor, I'm a participant of this event as well!
This event was mainly held in the ma pona pi toki pona community, which's a community resides in stupid Discord. Despite that I don't quite like Discord, I still had to join the event, so I had no choice and joined their server. :(
Unlike the toki pona communities that I've joined, this Discord community is unique in its own way. Unlike IRC and Telegram, it supports live streaming of computer screen or phone camera right inside a voicechat. This feature was heavily utilized throughout the event. In fact, this feature enabled the performances to stream the content of their screen easily for the purpose of their performance.
Apparently, the community has stricter rules compared with other toki pona communities outside as well. I've heard rumors about unjustified banning inside the community, which I couldn't confirm, but I suspect that it's true. So I acted rather cautiously inside the community for avoid breaking any of the rules during the event.
The event was also being mirrored to Youtube and Twitch. However, the viewers there seems to be treated as second-class citizens as most of the things going on were happened in Discord. Plus, there were technical issues with the mirroring in times.
Enough talking about the Discord community. Now let's talk about the content of the event.
The event's packed with performances during the 24 hours, with a few breaks. Various performances, including games, story-telling, workshops, musical performance, were available. Some of the performances were repeated for a few times during the event so that people from different timezones would be able join. In addition, there're background games going on during the entire event. The participants were asked to fill in an attendance form, which was used for the surprise lucky draw.
There're a few musical performances during the event. I've listened to music from kala pona, jan Pensa and jan Usawi. I absolutely love the song "tawa lon linja" from jan Usawi for its catchy melody!
Spamming seems to be a part of the culture of the community. While jan Pensa was singing a song, one of them contained the lyrics "mu mu mu mu mu". Then the users kept spamming "mu mu mu mu mu mu mu mu mu mu" inside the event's channel:

In addition, when music's being played, I've seen people collectively posting the cat music gif repeatedly. And I've seen other kind of spamming from other occasions. Nevertheless it's fun to look at those spams. And it's even more fun to participate in it. :P
I've played three games during the event, including Gartic Phone, sketchful.io and Classicube. The rule of Gartic Phone is that a player would write a sentence in toki pona, then someone else would draw an image based on the sentence, then someone else would write another toki pona sentence based on the image. This process keeps repeating. In the end, the sentence would be completely different from the original one. Unfortunately, a few of the players couldn't speak toki pona well (notice how "jan li tawa wawa" get turned into "jan li kama wawa". In English, that'd be "a person runs" get turned into "a person becomes strong"). The less-fluent speakers made some extra content get lost in translation.

For sketchful.io, it's like post-it draw-it. But the host had loaded a custom word list that only contained toki pona words. It happened right before the closing session of the event. At first, around 20-30 players had joined the game. People began leaving before the game ended because it got overrun for a bit. At the end of the game, there were only like 8 to 10 players. With all those people leaving, I managed to win the game! :P
As for Classicube, it's a game similar to Minecraft Classic. It's one of the background events that the participants could join anytime during the event.
I'm impressed that the community had built a rather decent toki pona world during the 24 hours of the event:

Too bad! I felt super dizzy after playing this game for a while. So I couldn't play it for long. :(
In the closing session of the event, it's all those thanks for joining and stuffs. And there was a lucky draw as well. In the very end of the event, it was a countdown of the 20th birthday of toki pona. They counted from "mute", "mute", "mute", "mute", "mute" to "tu" "wan" "ala!". In English, that'd be "many, many, many, many, two, one, zero!". We said "many" because in the simple toki pona numeral system, all numbers more than 3 are called "mute". After the countdown, we sang happy birthday in toki pona. During the end of the event, people kept spamming in the event's channel to the extent that the moderators had to enable slow mode of Discord for the channel to slow down the spam.
That's it for the event. I'm very glad to have joined it. See you next year! :D
Big news! Sadale'll be exhibiting in Maker Faire Shenzhen 2019 in booth E10. It'll be my first time starting a booth for doing exhibition in my life! :)
ilo nanpa will be the main project to be exhibited. That's because it's the most successful project of Sadale. It's also my only project that had entered "mass" production stage (well, it's actually home-based "mass" production with the quantity of produced units of 40ish). I'll be introducing toki pona numeral, toki pona language and ilo nanpa device to the visitors of my booth during the event.
In addition of that, I'll probably be also showcasing some of my smaller projects, including Arduino 1602 Snake (Gaming Device), Raspberry Pi Single Key Keyboard, the Poopie game and HTML gallery generator during the exhibition.
All visitors'll be welcomed to try out the projects that I'll be exhibiting. :)
I've planned for doing an exhibition more than a year ago. That's why I had checked out Maker Faire Hong Kong 2018 to see what exactly'd be going on in Maker Faire.
Well, that was pretty much I had expected. There's exhibition and seminars and workshops. Except that the exhibition were meh. Honestly, I was quite disappointed by the exhibition of Maker Faire in Hong Kong last year.
Almost all of the exhibitors were from education institutes. Some of them were schools, while some other of them were cram schools. Despite that there're a few impressive projects among them, almost all of them were lame, dumb, meh and unimpressive. Those projects just involved using very limited technical skill. As for cram schools, they're just joining the faire for marketing their classes for kids.
Another common type of exhibitors were those who make education materials. Developing education material isn't bad per se. However, no one's going to use them for anything professional. No one ever! And what those education material doing is to raise a bunch of half-ass engineers. Same goes for cram schools. And I was hoping that I'd be able to find more exhibitors that's actually technically competent for developing something serious.
I think I'd only found like 5 non-education makers out of like 100 booths. Well, I guess learning solely from classes is a culture of Hong Kong, which's an idea that I don't quite buy into because I've become what I'm now mainly by self-learning using online resources. And the problem with those classes is that it won't take the kids far enough to be able to do everything they want to do. And that's how some, if not all of those education institutes make money. They keep teasing the kids so that they'd apply for more and more classes. :(
Despite being lame, I still planned to join Maker Faire Hong Kong this year as an exhibitor. Mainly because it'd be the most convenient to me. To my surprise, it's apparent that there'd not be any Maker Faire in Hong Kong this year. I've contacted the organizer earlier this year without any response at all. And their website is still displaying the info of the 2018's event as of the time of writing.
Since there's no Maker Faire in Hong Kong, and I still intend to do exhibition this year, I've decided to exhibit in a Maker Faire that's close to Hong Kong. The Shenzhen one is the closest one. Therefore, I decided to join the one in Shenzhen.
As a bonus, exhibition is free for individual and non-commercial team exhibitors. It's so nice of the organizer to offer booths to us for free! I'd like to thank the organizer and sponsors of the event. :)
By joining this exhibition, I'll be doing these things for the first time in my life ever!
I'm so hyped up! Can't wait to join the event! See you in booth E10 of Maker Faire Shenzhen 2019! :D
This is the second blogpost of Ilo Nanpa. You can read the first blogpost here: Ilo Nanpa (Toki Pona Calculator) - Release Announcement and Technical Details
Hey guys! I'll be distributing new units of ilo nanpa! Previously, ilo nanpa was distributed in irregular batches. From now on, I'll be shipping a batch at approximately the end of each month (unless I run out of stock).
With time-efficient production method, the time-cost of unit production is reduced by quite a lot. Therefore, I'm lowering the average donation target per unit from $30 to $20 for all of the new units produced, including international shipping fee.
For each donation made, I'd add the amount to the donation pool. For each unit shipped, I'd deduct $20 from the pool. The fund available in the donation pool will be used for giveaways, or for subsidizing those who're donating less.
For a donation of $25 per unit or above, you'll be enlisted as one of the honored donors in the official website of ilo nanpa.
If you're interested, here's the procedure of getting a unit of ilo nanpa:
If you wish to add funds to the donation pool without getting a unit of ilo nanpa, just donate to me using the donate button in the homepage of my website and contact me. The donation will be 100% used for subsidizing the recipients who are donating less or not donating (i.e. giveaway). If you wish to be named, a donation of $5 would enlist you as one of the honored donors.
The official website of ilo nanpa has been updated to show the number of units in stock, units distributed and the amount of fund available in the donation pool.
Here's the breakdown of the spending of donation for each unit:
I'd like to take this opportunity to thank all of the previous donors. With the donated amount, I've purchased new equipment, which allows me to produce ilo nanpa more efficiently.
As I'm rather new in electronics world, my current technical ability of assembling electronic parts is rather rudimentary. I've been assembling electronic devices by soldering the components onto the PCB using soldering iron one-by-one, which is extremely time consuming.
Before this project, I only had to assemble one, or perhaps a couple of prototype units for my projects. So the time inefficiency wasn't an issue. However, this had changed since the completion of the ilo napna project. I have to manually solder a handful of units of the device in order to distribute them to Toki Pona speakers. And it took me two hours to produce a unit of the device, which was dog slow. And the demand just isn't high enough to justify outsourcing the assembly process.
As the previous production method was time consuming, I looked into more time-efficient production alternatives. After some Google-Fu, I've found that solder paste stencil-based soldering is probably the way to go for the following reasons:
I've purchased the following equipment and material for experimenting with this production method:
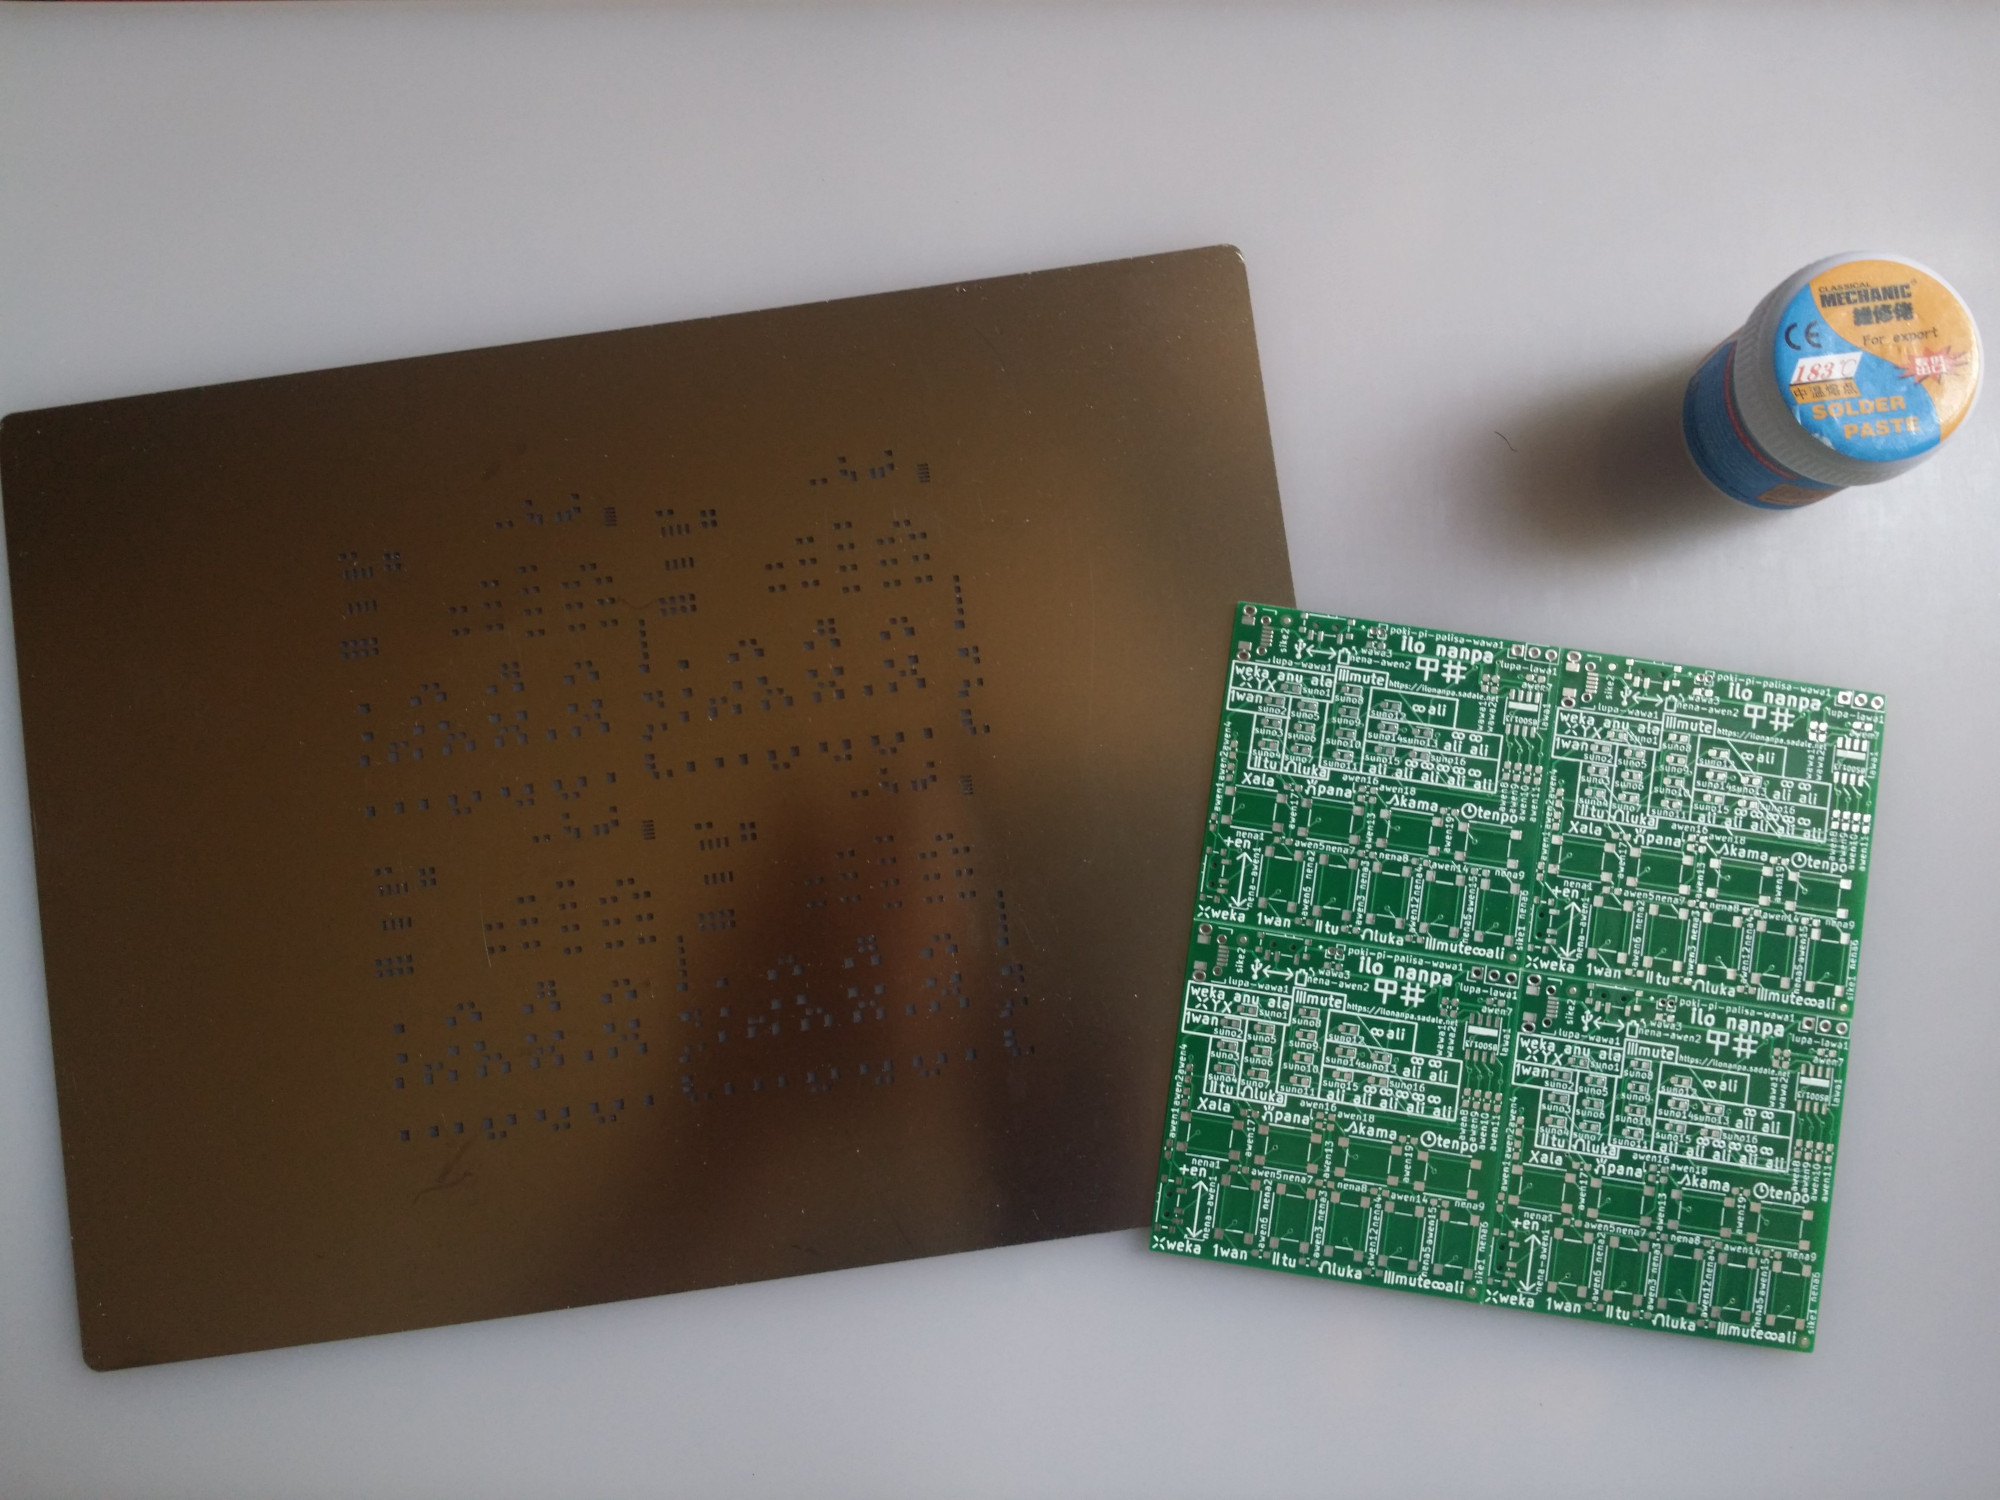
I've purchased a new batch of ilo nanpa boards. This time, the boards are panelized so that four units of the device can be produced for each PCB. After soldering them, I'd break up the PCB and I'll get four devices from a board. Here's the photo showing a jar of solder paste, panelized PCB and a stencil on a heat-resistant mat:
Not all components can be soldered by this technique. Only SMD components can be soldered in this way. Fortunately, most of the components of ilo nanpa are SMD components. The only components that require using soldering iron are the USB port, programming port and the battery holder.
I mostly just followed this solder stencil tutorial on Youtube. Except that I'm using hot air gun instead of reflow skillet for soldering the components onto the PCB.
Here's how I'm producing the devices using this new production method:
In step 2, since some spare PCBs are required for using the stencil, the 10 thought-to-be-useless wrong ilo musi boards that I ordered long time ago is now somehow useful. They're perfect to be used for holding the ilo nanpa PCB workpiece in place so that I can apply solder paste using the stencil easily.
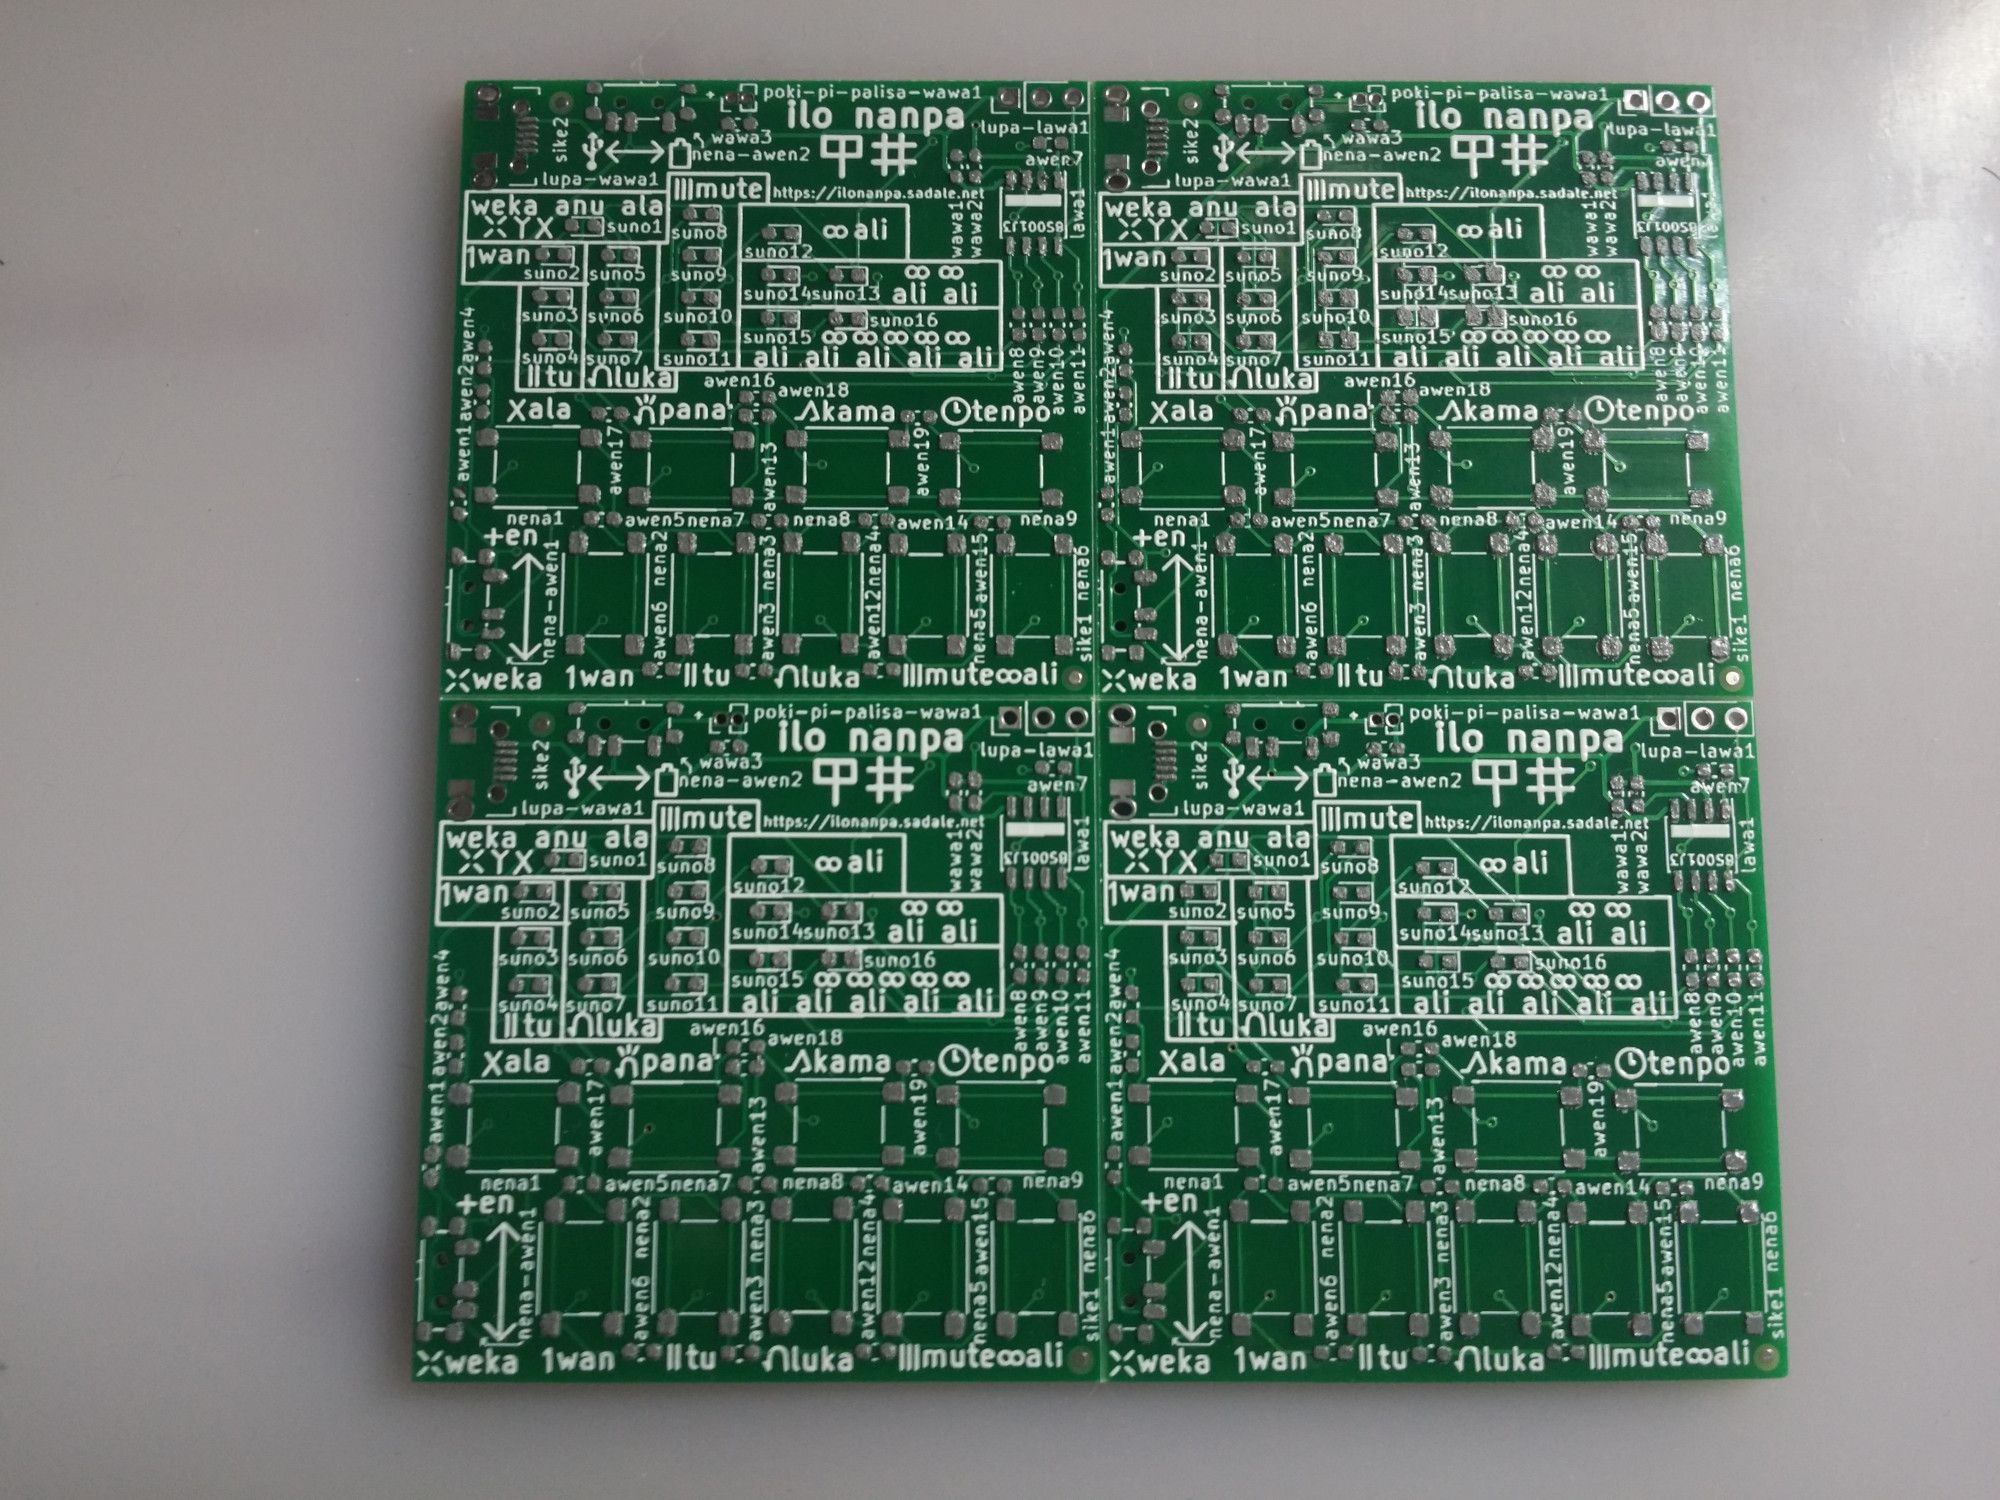
At the end of step 3, here's a photo showing a work-in-progress panelized PCB. Take a close look and you'll see there's a layer of gray solder paste applied on each of its pads:
As for the hot air gun in step 5, it's empirically found that setting the air flow to 2/8 and the temperature to 3/8 works well for soldering the components.
This new production method works very well. Despite that the stencil is a bit expensive, it has cut down the production time by quite a lot. Before using this method, I produced ilo nanpa at a rate of a unit per two hours. After using this method, I managed to produce four units within 2.5 hours, with an additional 0.5 hours of setup and cleanup time.
This production method is very helpful for producing several units of electronic devices in timely manner. For a demand of 20-ish units, it seems to me that it's the go-to method for production. I'm very glad to have learned it. I'll continue be using this method for small scale production.
nimi mute ni pi toki pona li lon. o pilin e ni.
Good news guys! The Ilo Nanpa project is completed! It's a calculator for Toki Pona numeral.
Media coverage:
Toki Pona is a minimalist constructed language invented by jan Sonja. It has less than 130 words. It has an obscure numbering system.
Unlike the numeral of most languages, Toki Pona Numeral is a not a base-10 numeral system. There're two numbering system in Toki Pona, they are the simple system and the complex system. Here's the simple one:
Obviously there's no point making a calculator for the simple system. Here's how the complex system work. It's similar to coin-counting. Numbers are made up by adding up existing numeral words as follows:
For example, 37 would be mute luka luka luka tu because 20+5+5+5+2 is 37.
This Ilo Nanpa calculator is designed for working with the complex numbering system of Toki Pona.
Ilo Nanpa has the following feature:
Ilo Nanpa has 16 LEDs, 9 push buttons, an en/weka (addition/subtraction) slider switch and a power slider switch. A photo of Ilo Nanpa is shown below:

The power slider switch can be used for switching between battery power and USB power. To power off the device, remove the USB and slide the slider switch to the USB position. Alternatively, remove a battery and slide the slider switch to the battery position.
As shown above, it has an LED for "weka anu ala" (negative or zero), an LED for "wan" (1), a couple LEDs for "tu" (2), three LEDs for "luka" (5), four LEDs for "mute" (20), an LED for "ali" (100), a couple of LEDs for "ali ali" (200), and a couple of LEDs for "ali ali ali ali ali" (500).
Reading the number is rather straight forward. You just add up the numbers of the lit LEDs and that's it. For example, if three "mute", two "luka", a "tu" and a "wan" lights up, that'd make "mute mute mute luka luka tu wan", which is 73. If an "ali ali ali ali ali", an "ali ali" and a "wan" lights up, that'd make "ali ali ali ali ali ali ali wan", which is 701.
If the displayed value is zero, only "weka anu ala" would be lit. For negative numbers, the shown LED would be the same as positive number, except that the LED "weka anu ala" would also be lit.
There're nine buttons (ala, wan, tu, luka, mute, ali, pana, kama, tenpo) and an en/weka (addition/subtraction) slider switch. They're used for operating Ilo Nanpa.
Resetting the value to zero - ala button
The "ala" button resets the current number to zero.
Performing Addition and Subtraction Operations - wan, tu, luka, mute, ali buttons
The buttons "wan", "tu", "luka", "mute", "ali" behaves in this way: When the slider switch is in "en" (addition) position, the button pressed would add its value to the current value. When the slider switch is in "weka" (subtraction) position, the current value would be subtracted from the value of the pressed button.
This design makes sense in Toki Pona numeral because, for example, when you're trying to add 31 to the current value, as 31 is "mute luka luka wan", you'd just slide the slider switch to "en" position and press "mute", then "luka", then "luka", then "wan". If you want to further add 3 to that number, you'd just press "tu" then "wan" after that. If you want to subtract a number from current value, you'd slide to "weka" position and type in the number with the buttons.
Saving and Loading Value - pana, kama buttons
The "pana" button saves the current value displayed on LED. The "kama" button behaves like the "wan", "tu", "luka", "mute" and "ali" buttons, except that it adds or subtracts the current value with the previously saved value depending on the slider position.
Multiplication can be performed by using "pana" and "kama" buttons. For example, if you want to compute 137x5, first you resets the value to zero using "ala". Then you slide the slider switch to "en" position. After that, you type in 137. Then you press "pana". Then you press "kama" four times, which is one time less than the desired multiplier. And you'd get "ali ali ali ali ali ali mute mute mute mute luka", which is 685.
The saved value of "pana" persists over power cycles.
Stopwatch and Timer - tenpo button
This is the most complicated function of Ilo Nanpa. For simplicity, let's consider only positive value for now. I'll cover negative value later.
After the "tenpo" button is pressed, Ilo Nanpa would enter timing mode. It adds or subtracts the current value by one for each second elapsed, depending on the position of en/weka slider when the timing mode started.
During timing mode: pressing "wan", "tu", "luka", "mute", "ali" and "kama" would have no effect. Pressing "tenpo" would leave timing mode without doing anything to the current value. Pressing "ala" would leave timing mode and reset the value to the one before entering timing mode. Pressing "pana" would save the current value without leaving timing mode.
If you're using Ilo Nanpa as a timer, it would be counting towards zero. When zero is reached, it would stop the timing and the "weka anu ala" LED would blink. The brightness of the LED would be higher than usual. Pressing either "tenpo" or "ala" would leave timing mode and reset the value to the one before entering timing mode. Pressing "pana" would save the current value, which is zero. Pressing all other buttons would have no effect.
If you're using Ilo Nanpa as a stopwatch, it would be counting towards the limit (i.e. 1600 for positive number). When the limit had reached, it would stop timing and the LEDs would show the limit value and blink. The brightness of the LEDs would be higher than usual. The behavior of all buttons are the same as the one during timing mode.
If timing mode is performed with a negative value, the value update would perform 20x faster, which means that the value would get updated for every 0.05 seconds instead of every 1 second. Other than that, the behavior are the same for positive and negative value.
UPDATE : some info in this section is outdated, including production time and the way to obtain a unit of this device. Please refer to this new blogpost for the updated info: Future Distribution of Ilo Nanpa with Time-Efficient Production Method
I'm interested in distributing this Ilo Nanpa device to Toki Pona speakers.
The material cost is cheap. It only costs around $5 for a unit, including shipping fee to my home. The shipping cost to the recipient would costs <$5. However, it takes me 2 hours to manually produce a unit of Ilo Nanpa, including soldering, flashing the program and quality control. That's a lot of work for producing each unit.
If you're interested in getting an Ilo Nanpa, please fill in the form in the official website of Ilo Nanpa. At this stage, I only offer this device to Toki Pona speakers. I'll personally verify if you're capable for written communication using Toki Pona by using the contact methods you provide in the form. I ask about how much you're willing to donate in the form. It's ok to fill in any amount. At this stage I mainly want to estimate the demand and the amount that the recipients are willing to donate. If you don't have any spare money, don't be ashamed to fill in 0 there. Just tell me your situation in the "sina wile toki e ijo ante, la o toki tawa mi kepeken lupa nimi ni:" text box and there's still a chance that you may get one. :) No commitment is needed to fill in the donation amount. It's understandable that one may change their mind on the amount to be donated. However, please do not deliberately lie because that would screw up my budget.
If you have the money, please kindly donate some to me as it takes a lot of time to develop and produce this device. The extra money will be used for sending units to those who're donating less, or who have no spare money to donate.
I'm not sure about the total demand of this device. If the demand is small (maybe less than 10 units), I'd be happy to manually produce the units as long as I can recover the shipping cost and material cost.
It'd be very embarrassing if the demand is between 10 units and 50 units. There's no way that I'd go for mass production, and it wouldn't be fair for me to do the work with zero labor cost. If the demand is somewhere in between 10~50 units, I'd like to get $40 for my two hours of work (shipping fee and material cost not included), which is quite expensive and I doubt anyone would be willing to spend this amount of money for this simple device. :( I don't know. Perhaps I could get another Toki Pona speaker to share the workload and help doing the soldering and send the device to other Toki Pona speakers. Of course, anyone doing that would get a share of donation for the units that they've soldered. Please contact me (Sadale) on the Toki Pona IRC channel if you're interested in helping.
If the demand is high (perhaps more 50 units), I'd possibly pay a PCB assembly to do that for me, maybe I can start a crowdfunding campaign for that. Anyway, it may not be easy to get a PCB assembly to produce this device. Unlike conventional electronic devices, this device uses unusual electronic designators. Conventionally, resistors are labeled as R1, R2, R3... Capacitors are C1, C2... LEDs or diodes are D1, D2... For this device, resistors are awen1, awen2... Capacitors are wawa1, wawa2... and LEDs are suno1, suno2... This can be a problem for PCB assembly to produce it. If I go for mass production, perhaps I have to do a bit of compromise on the designator names.
If you're interested in getting a development kit, and you're willing to cover the material and shipping fee, I'd be more than happy to send you one. That's because most of the time involved in distributing the device are spent on soldering. It'd be a good thing if you're willing to do that on your own. Of course, I'd even be happier if you're donating a bit extra for the development effort. :P Almost all components of the device are the SMD ones. Fortunately, most of them doesn't have small pitch. The only difficult part is the USB port having a pitch of around 0.65mm. The microcontroller is having a pitch of 1.27mm, which isn't difficult. Other than that, there're just a lot of 0603 components, some SMD buttons, a 3-pin male header, a battery holder and a couple of mini slider switches. They aren't difficult (to me :P) to solder at all. I'll also ship a programmer to you so that you can program the microcontroller.
The objective of this project is to experiment with working with low-end microcontroller. After some research, it's found that STM8S001J3 is one of the cheapest microcontroller in the market with a cost of only $0.2 per unit at a quantity of 10k. This microcontroller has nice amount of flash, RAM, EEPROM and peripheral. It has 8kB flash, 1kB RAM, 128 bytes EEPROM. Compared with microcontroller series like the ATTiny or the PIC ones, this one is both cheaper and better. The only shortcoming of this microcontroller I've found is the voltage range. It's a bit narrow compared with other low-end microcontrollers.
STM8S001J3 only has 8 pins, with 5 IO pins. They have another model that's a bit more expensive with 20 pins. I intentionally pick the 8 pins one to practice IO multiplexing.
Technical objective aside, this would probably be the first electronic device designed for Toki Pona language in mind.
The most interesting aspect of this project is that the microcontroller only has 5 IO pins, yet it's capable for interfacing with 16 LEDs, 9 push buttons and a slider switch. One of the 5 IO pins doesn't even have push-pull output capability. It makes the project even more challenging.
The schematics of the project is shown below. Click the image to open it in a new window:

Charlieplexing is a technique of multiplexing output pins for driving many LEDs with small number of pins.
Conventionally, an output pin can only have two states, they're either high or low. Pins on modern microcontroller often have one more state in addition of the two states, which is high-impedance state. In high-impedance state, the pin behaves as if it's disconnected from the circuit.
To perform Charlieplexing, one would list out all of the possible pin pairs of all available pins to be used for driving LEDs. For example, if I have 5 LED pins, A, B, C, D and E, the pin pairs would be AB, AC, AD, AE, BC, BD, BE, CD, CE and DE. After that, we connect two LEDs to each pin pairs. One of them is forward-biased. Another of them is reverse-biased. Since there're 10 pin pairs, 5 pins would be able to drive 10x2 = 20 LEDs.
To light up an LED, we'd set all irrelevant pin to high-impedance state, which "disconnects" the pins from the circuit. After that, we set a pin to high, another pin to low, then the desired LED would be lighted up. For example, if you wish to light up the reverse-biased LED connected to the AB pin pair, set pin C, D and E to high-impedance, then set pin B to high and pin A to low. Then the LED would light up.
For this particular microcontroller, one of the pins is not capable for high-sink output. It means that it is not possible to output the kind of high signal that's required for Charlieplexing. That would take away 4 LEDs. Therefore, this device has 16 LEDs instead of 20 LEDs.
For this device, one LED is lighted up at a time. Then it switches to another one. This continues and repeats. At high switching frequency, it gives the user an illusion of multiple LEDs being lit at the same time.
The input buttons are multiplexed using voltage divider. There're 9 buttons and a slider switch.
The slider switch is attached to a dedicated pin. One of its position is connected to Vcc via a 470k resistor. Another of them is connected to ground via a 470k resistor. A high resistance is chosen to minimize the interference with the LED circuit.
For the 9 buttons, they're divided into three groups. Each group is having three buttons. The first group is ala-wan-tu. The second group is luka-mute-ali. The third group is pana-kama-tenpo. Each group is connected to an ADC pin of the microcontroller.
The microcontroller has two pins connected to ADC out of the box. To connect the third pin to ADC, an option byte has to be programmed. With three ADC-capable pins, we can have three button groups each handling three buttons.
Each ADC pin is pulled down by a 470k resistor. A high value resistor is chosen so that it would minimize the interference with the LED circuit. When a button is pressed, the ADC pin is parallelly connected to Vcc via a 10k (ala/luka/pana), 10k+20k (wan/mute/kama), or 10k+20k+20k (tu/ali/tenpo) resistors. Holding any button would cause the Vcc resistor and the pull down resistor to form a voltage divider. The reading of the voltage divider is fed to the ADC pin of the button group. The value chosen on the Vcc side is significantly lower than the pull-down side because there's a limit of input impedance of the microcontroller. If the is input impedance is too high, the ADC wouldn't work.
Is it alright to share the same IO pin for both input and output? Yes, it is. But it's more complicated than I thought. I ran into a few issues due to the sharing of input and output pins.
Button Detection Issue
I thought that the ADC reading for each button group would simply be a voltage divider as long as I've set all output pins to high impedance state. For example, pressing "ala" would makes the ADC reading to be MAX_ADC_VALUE x 10k/(470k+10k), pressing "wan" would be MAX_ADC_VALUE x 30k/(470k+30k) and pressing "tu" would be MAX_ADC_VALUE x 50k/(470k+50k). I was mistaken.
This thought is wrong because it doesn't consider that the input pins and the output pins are sharing the same pin. It means that when a button is pressed, the Vcc connected to the 10k/30k/50k resistor would get to the ground via both the pull-down resistor of its own button group and other button groups via the Charlieplexed LED network. That's because the Charlieplexed LED network is connected to all button groups, which is pulled down to the ground. In addition, the en/weka slider is also connected to the Charlieplexed LED network. All of these would affect the ADC reading.
Due to manufacturing tolerance, the forward voltage of each LED on the Charlieplexed LED is not known. Therefore, there's no easy way to calculate the value of ADC reading when a button is pressed. For this reason, I've included ADC reading calibration mechanism in the factory mode of the firmware.
The ADC calibration scene would require the user to press a button. It records the ADC reading of the button. The operator is required to press each of the buttons for a few times. The ADC readings of each button press are averaged out and the ADC threshold values for each button are calculated and they're saved to the EEPROM of the microcontroller. After the calibration, the microcontroller is ready for detecting button presses.
It's empirically determined that the effects of holding buttons of other button groups is negligible to the ADC reading. However, the en/weka slider does have substantial effect to the ADC reading. For this reason the ADC reading calibration are to be performed for both "en" slider position and "weka" slider position.
en/weka Slider Detection Issue
Unlike other buttons, this slider is connected to either Vcc or Ground via a 470k resistor. As the resistance is high, lighting up any LED or pressing any button would affect the detection of en/weka slider for a while. For this reason, the firmware is designed in a way that it won't perform en/weka detection when any button is held. It also stops lighting up the LEDs for a short time once a while for detection of en/weka slider position.
LED display issue
Holding a button would connect Vcc to the LED network with a resistance of 10k/30k/50k. That causes some LEDs to light up.
As a workaround, a model of LED with lower brightness is chosen. It's empirically found that the one with lower brightness is less vulnerable to this issue. With this kind of LED, the brightness caused by pressing button is far lower than the LEDs lit by the display of number. Therefore, it wouldn't be a problem for normal operation at all.
Way to Go!
Since all these issues have got a solution, there isn't a problem anymore. The device works with input and output pins multiplexed! I managed to get 5 IO pins to control 16 LEDs plus 9 buttons plus a slider switch! :D
Factory mode can perform ADC reading calibration as mentioned above. In addition of that, it's possible to perform key press tests and LED brightness adjustment using this mode.
To enter factory mode, hold down "ala" on power up for 5 seconds. After that, three "mute" LEDs and the "ali" LED would light up. It means that the device is now in password mode. By pushing the correct button sequence, the user would enter factory mode. If the user had typed in a wrong button sequence, he'd be led to normal mode. This design is to prevent unintentional access of factory mode. That's because if the user had mistakenly entered factory mode, he could screw up the ADC calibration values, which would break the button detection mechanism of the device until a proper recalibration.
Please refer to the README file of official Github repository of Ilo Nanpa for understanding how to work with factory mode.
Since we've got a low pin count microcontroller, we couldn't dedicate a pin for programming and debugging. The programming pin shares the same IO pin as luka-mute-ali button group and a few LEDs. This is a problem because we need a mechanism to reprogram the microcontroller in case it's needed.
To get the microcontroller to stay in programming mode, hold "pana" key on power up. As long as the button is held, the device would stay in programming mode. Once it's release, it'd enter normal operation mode.
The pana-kama-tenpo button group is intentionally chosen as the programming button. That's because it's a bad idea to pick any other button groups. The luka-mute-ali button group is shared with the programming pin, which means that holding only of these buttons may affect the signal of programming pin. The ADC of ala-wan-tu button group is only available after the option bytes are programmed. In case the engineer had forgot to program the option bytes, the button press of ala-wan-tu wouldn't get detected. That would cause the microcontroller to get locked up and it wouldn't be possible to reprogram it anymore.
Since using any of the other button groups is a bad idea, the pana-kama-tenpo group is chosen as the programming button group.
Let's not worry about debugging. It just isn't possible to spare a pin for debugging, unfortunately.
By the way, when I was trying to implement this mode, I screwed up a few times and permanently locked up a couple of microcontrollers. I had to throw them away and solder a new microcontroller onto the PCB. :(
This is the second PCB I've designed. The first one was for ilo musi (the game console that I had been developing). In fact, the third prototype of ilo musi is mostly completed. It's soldered on a PCB. I've never got the time to blog about it, tho.
The PCB was designed using KiCad. I use it mainly because it's free. As a bonus, it's open source. :)
The PCB of Ilo Nanpa is 50mmx50mm. I keep it small because some PCB fab offers a cheaper price for 50mmx50mm boards. I ordered 10 boards for $4 (shipping fee not included), and somehow they delivered 18 boards to me. :D
The PCB is a double layer one. There's a layer on the frontside of the board and another layer on the backside.
Other than that, there's nothing very interesting about the PCB of this project.
I've learned quite a lot from this Ilo Nanpa project, including:
This is also my first completed electronic project having a PCB! :)
Now the Ilo Nanpa project is officially completed. All I need to do is to distribute the device. :)
I'll continue to work on ilo musi, which is the game console project that I had been working on and blogging about. See you!