As I've mentioned in my previous blogpost, the clock control mechanism were implemented. But I've been too busy to blog about that. Now I've got a moment to do a write-up of the game console project about that.
The microcontroller STM32F030F4P6 is capable for running at 48Mhz. The 48Mhz system clock is generated from 8Mhz HSI clock. It's multiplied with PLL by up to 12 to generate a system clock of up to 48Mhz.
The game console will be battery-powered. Power consumption is critical to the battery life. To minimize the power consumption, we allow the game to enter sleep mode. With frame limiting, it's highly probable for the game to have some idle time before it is required to process the next frame. During that period of time, the game would enter sleep more to save power. Of course we'd disable the PLL in sleep mode to further reduce the power consumption. And that'd cause the system clock to be limited to 8Mhz when it's sleeping.
And here's a problem. There're many clocks derived from the system clock in the microcontroller. Most of them aren't very time-critical. However, for sound generation, timing is very important. Otherwise the sound generated would be distorted.
There're two causes of sound distortion. One is the selection of using, or not using PLL. Another is modification of timer prescaler. It's empirically determined that the sound distortion caused by toggling the state of usage of PLL is negligible. However, changing the timer prescaler does affect the sound quality for quite a bit.
Since changing the timer prescaler would affect the sound quality, we'd want to avoid that. Unfortunately, if we want to preserve the value of the timer prescaler, and if we still want to enter sleep mode to save power, the maximum possible clock would be limited 32Mhz instead of 48Mhz.
Here's the reason behind it: The timer clock can be calculated with this (overly simplified) equation:
(timer clock) = (system clock) / (APB1 prescaler [including the x2 mechanism]) / (timer prescaler + 1)
Timer clock has to be a multiple of 8. APB1 prescaler has to be power of two. Timer prescaler can be any integer.
Since we need to enter sleep mode, we have to set the system clock to 8Mhz at some point of the program. Let's assume that we set the APB1 prescaler=1 and timer prescaler=3 at 8Mhz. So (timer clock) = 8Mhz / 1 / (3+1) = 2Mhz.
If we want to maintain the same timer clock without changing the timer prescale at 32Mhz, we could easily do that by just changing the APB1 prescaler to 4. So we get (timer clock) = 32Mhz / 4 / (3+1) = 2Mhz, that's still 2Mhz. Therefore, the sound quality would be good at 32Mhz.
However, things get tricky if we want to maintain the same timer clock as 8Mhz at 48Mhz. If we aren't changing the timer prescaler, we'd need to pick APB1 prescaler=6. However, APB1 prescaler has to be a power of two. So it has to be rounded to APB1 prescaler=8. Then we'd be forced to change the timer prescaler from 3 to 2 in order to maintain the timer clock. So we get (timer clock) = 48Mhz / 8 / (2+1) = 2Mhz. However, the switching of timer prescaler will cause noticable sound distortion as shown below:
32Mhz without frame limiting, no sound distortion:
32Mhz with frame limiting, negligible sound distortion:
48Mhz without frame limiting, no sound distortion:
48Mhz with frame limiting, noticable sound distortion:
Our solution is to let the game itself decide to use 32Mhz or 48Mhz clock. If the game prefers higher sound quality, then it should stick with 32Mhz. If it wants performance, it should choose 48Mhz. If the game has sound, it's recommended to use 32Mhz as possible and switch to 48Mhz only when doing computation-intensive stuffs.
I've made a minimalist breakout game. At clock rate of 32Mhz without frame-limiting, it can achieve 40fps with around 80 bricks, and 250fps with no bricks. The recommended fps is 8~10fps because of the hardware limitation of the update rate of LCD. Since the max fps is much higher than the target fps, the game console can save quite a lot of power by doing the frame-limiting to 8~10fps with the use of sleep mode. :)
It's very simple. There's just one API call that modifies the clock system. That's:
If wakeUpToBoostMode is true, it'd enter 48Mhz mode after the end of the sleep. Otherwise that'd be 32Mhz.
And it has a few other API calls for querying the status of the clock system:
Clock Control System is mainly used for frame-limiting and saving power. In the game, there's a main loop. The game should call systemSleep() after the end of processing of each frame.
Here's the typical usage inside the main loop:
The following features were implemented. But I'm saving them for the coming blogpost:
I'll be working on the following stuffs:
Stay tuned. I'll make another blogpost soon! :)
toki! ni li nimi mute mi pi nanpa wan pi toki pona lon lipu mi. tenpo suno ni la mi pana e kalama musi "mi ken ala moli e pipi" tawa jan ali a! tenpo suno luka tu wan la mi pali e kalama musi e sitelen tawa. tenpo pi mute wan la mi pali e sitelen tawa a!
tenpo pini pi tenpo sike ni la mi pali e kalama musi mute tan tenpo "Global Game Jam 2018". kalama musi wan pi ona mute li pona mute tawa mi. mi pona e kalama musi ni li pali e sitelen tawa pi kalama musi ni li pana e sitelen tawa ni tawa jan ali.
tenpo pini la mi pali e kalama musi. taso mi pana ala e ijo ni tawa jan ali. jan jo ala e ijo ni la ona li ken ala ante e kalama musi.
tenpo ni la mi pana e ijo ni pi kalama musi tawa jan ali a! sina ken ante e kalama musi ni.
Hey guys! Today I'm releasing a toki pona song "Futile Attempt of Killing Mosquito" along with an animation. I've spent 8 days and nights on this piece of music and its animation! It's also my first serious animation project in my life!
This music came from Global Game Jam 2018. I decided to be a musical guy for the event. So I've made quite a few pieces of music as a practice. That's because we're required to get the work done within 48 hours in the event. So I have to get familiar with the tools. A few months after the event, I found that I love one of those musical segment particularly. Then I elaborate this part and enhance it and I've made an animation for it. And here we have this musical animation.
Unlike my previous music, this time I'm providing source files of music publicly and direct download link to a few variants of its animation. That makes remixing and editing the music and animation much easier compared with my previous works!
o lukin e sitelen tawa ni pi kalama musi lon lipu Jutu!
Check out this musical animation on Youtube!
[o kute e ni! | Click here to listen to it]
sina ante e sitelen tawa e kalama musi la o toki e mi. ona li pona la mi wile pana e lupa pi pali sina lon lipu ni a!
If you distribute a remix of any resources from this project, feel free to inform me. If it's a good one I'd be happy to put up a link to your work right in this blogpost!
lipu lawa pi "CC BY 4.0" li lawa e sina la sina ken kama jo e ijo lon sewi lipu.
License of the resources above: CC BY 4.0. Please attribute to this blog post or sadale.net. If you do not want to do the attribution, please contact me and let me know what you're going to use these resource for. It's very likely that I'll grant you attribution exemption.
sina wile ante e kalama uta la o kepeken e ijo "kalama musi" anu "kalama musi pi kalama uta". sina pini kalama uta la o kama jo e ijo "kalama musi weka kalama uta" kepeken ilo sona kalama. ilo sona kalama li ilo "Audacity" anu ijo ante. ijo "kalama musi weka kalama uta" en kalama uta sina li kalama musi pi kalama uta sina.
sina ken kalama uta e nimi mute pi kalama musi ni kepeken toki ante a!
If you want to do vocal swap, first, download the resource "Music" or "Vocal Assist". While playing any of these, sing along and record what you're singing. Then download "Instrumental Music" and align your recording to the Instrumental Music track with software like Audacity. Then you've got your voice into this piece of music.
With vocal swap, you can even sing this song in another language!
sina wile ante e nimi toki la sina ken kama jo e ijo "sitelen tawa weka nimi Inli" e ijo "nimi pi toki Inli pi sitelen tawa". sina pini ante e ijo "nimi pi toki Inli pi sitelen tawa" kepeken ilo "Aegisub" la sina ken pali e sitelen tawa sin kepeken e ilo "FFMPEG" anu ilo ante. sina jo e sitelen tawa pi nimi pi toki ante a!
sina pana e ijo tan "Aegisub" tawa sitelen tawa lon Jutu la jan ali li ken lukin e nimi pi toki sina a!
If you want to modify the subtitles of the vid, download the resource "Animation without English Subtitles" and "SubStation Alpha English subtitles". Modify the resource "SubStation Alpha English subtitles" with software like Aegisub. With FFMPEG, you can combine the subtitles and the video. Then you get a video with subtitles in another language.
If you provide that subtitles file to the video hosted on Youtube above, other users can view your subtitles.
nasin nanpa wan li ni: sina wile kepeken e ilo "LMMS". o kama jo e ijo "ijo pi kalama musi pi ilo "LMMS"". sina pini lukin e nimi mute lon ona la o kama jo e "kalama uta". tenpo ni la sina ken ante e kalama musi ni.
nasin nanpa tu li ni: sina kama jo e ijo "kalama musi" e ijo "kalama musi weka kalama uta" e ijo "kalama musi pi kalama uta". sina namako e kalama musi ni kepeken ilo sona kalama.
There're two ways to do remix. The first way is to use LMMS to remix the music. Download the resource "LMMS Music Project Source File". Follow the instruction in the file and download "Vocal (for LMMS)". Then you can modify the music right inside LMMS.
Another way is to use other audio tools. After downloading the resources "Music", "Instrumental Music" and "Vocal", you can do operation on the audio to remix it. For example, one can add some drum and stuffs to it, or add some effects to it like adding filters or reverb effect or pitch change or something like that. Just do whatever you want with them!
nimi mute pi kalama musi ni li toki pona. :P
It's Toki Pona. It's a minimalist, constructed language invented by jan Sonja. The entire language is made of 123 words! It's rather easy to get fluent on it. I learned this language like two or three months ago. It took me like a month to learn it.
Long time ago I've attempted learning another constructed language Esperanto. I didn't have much success. Mainly because it really takes a bit of time to learn those vocabularies. I had to look up the dictionary from time to time. But Toki Pona's different. Once I learn all those 123 words, it isn't that difficult to understand any Toki Pona text and conversations. Even if I don't completely understand it, at least I'd have an idea on what it's about because I understand every single word. It's just that I don't understand the combination of words.
If you've nothing to do and interested in learning a useless language, Toki Pona is the language to go! Toki Pona community does exist. It's a bit small, tho. Still, it's rather fun to chat in a language that others couldn't understand. That's how do you talk shit about others without drawing any unwanted attention! :P
nimi mute li pona lili. sitelen lukin li pona mute. o lukin e sitelen ni:
A image's worth thousands of words. Take a look on this pic for an overview of how this vid were made:

mi kepeken e ilo mute a! mi wile ala toki e ilo ali. mi toki e musi ona.
I'll not go thru all of the software above. I'll just cover the interesting parts.
mi pali e kalama lili kepeken e ilo "Palette MCT". mi wile kepeken e ilo "Wine" lon ilo "Linux" tan ni: ilo "Linux" li ken ala kepeken e ilo "Palette MCT".
I made the melody and chord with Palette MCT. It's a great free tool for doing chord progression and designing melody. Since I lack knowledge on music theory about chord and stuffs, this tool is very helpful to me. Previously I did chord progression by trial and error. I adjusts each note tediously until I find the one that sounds right. With this software, it helps me to filter out those inappropriate chord immediately. Then I can focus on the one that sounds good.
Unfortunately, it doesn't support linux. I had to run it on wine. And it's the only non-FOSS tool I've used for this project.

As you see, there're those musical notes. The pink notes are non-chord notes. The black ones are the chord ones. And the colored rectangles with letters and numbers are the chord chosen for the measure.
This part was done before Global Game Jam 2018. Once again, this music is a enhancement of a piece of music made during my practice for the jam. :P
mi pali e sitelen kepeken ilo "Inkscape". ilo "Inkscape" pana e sitelen, tawa ilo "Synfig". mi pali e sitelen tawa kepeken e ilo "Synfig". mi kama sona e ilo ni kepeken tenpo suno wan kepeken sitelen tawa ni: [sitelen tawa "How to create animation in Synfig (3rd edition)"]. ona li pona mute.
I made the graphic with Inkscape. Then it's imported to Synfig and turned into animation. I learned its basic within a day using this video course: [How to create animation in Synfig (3rd edition)]. Synfig itself is free. But the video course isn't. Still, it's very affordable. If you're interested in learning it and cannot afford it, I'd be happy to buy a copy for you.

ilo "Synfig" li pona. taso tenpo mute la mi pali e sitelen tawa kepeken ona. mi pini pali la ona li pali e sitelen tawa kepeken tenpo mute mute.
Synfig is a great piece of FOSS animation tool. It's easy to use. But it's rather time consuming to make animation with it. After making the animation, it also takes quite a bit of time to render, especially for video that uses the "Curve Warp Layer". It takes an hour and half to render an animation with like 500 frames on my Bay Trail Pentium laptop. The Curve Warp Layer was used to make the swinging arm animation in our video.
mi pini pali e sitelen tawa ni la mi pali e ilo sona musi.
pali pi sitelen tawa li pona tawa mi. pali ni li musi. taso mi pali e ona kepeken tenpo mute mute. mi jo e tenpo sin la mi wile pali sitelen tawa sin.
The completion of this video marks the end of the break of my Portable Game Console Project. I'll get back to that project soon.
I enjoyed making this animation. The catch is that it takes far too much time to make one. I'll make another one in the future if I have the time.
The graphic system of the portable game console project is implemented! In addition, the clock control and power saving stuffs are also implemented. This blog post focus on Graphic System. I'll save other stuffs for my next blog post.
Double buffering isn't used in this procedure:
I've modified the sample program that I made for testing storage system, input system and synth system. Now that it's also capable for testing the new graphic system!
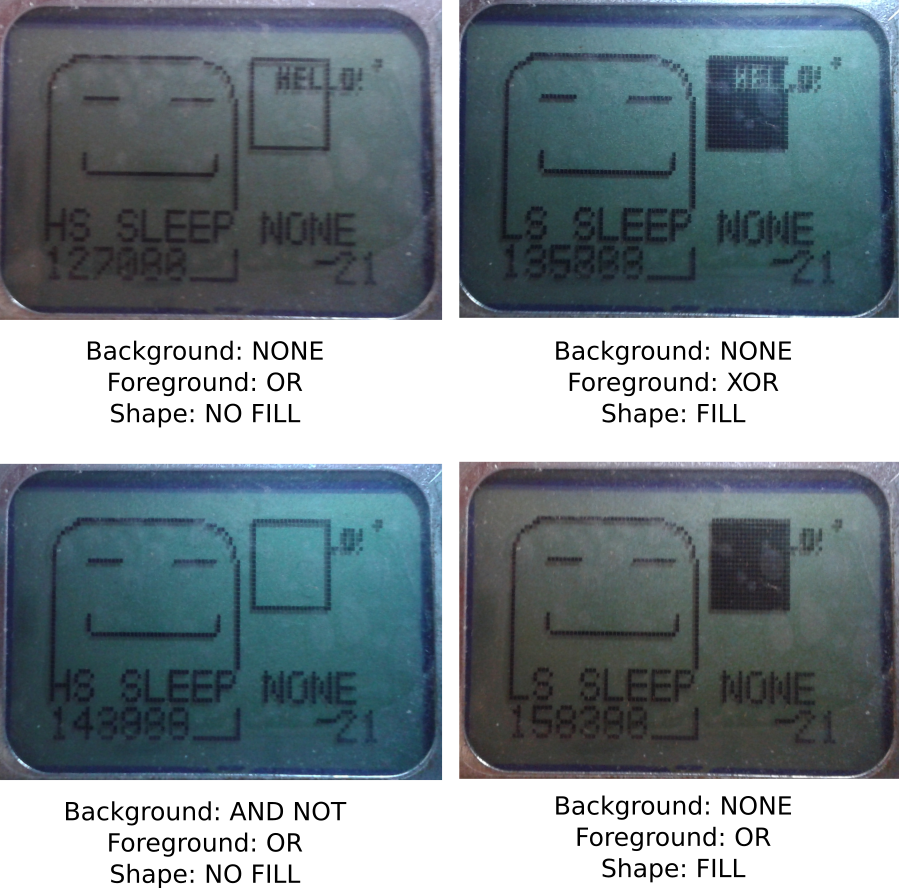
The updated sample program draws a lot of stuffs on the LCD, including a background image loaded from a resource in the ROM, a square, and system information like system tick, clock frequency and sleep mode.
In the updated sample program, the drawing mode of the square can be configured. Here's a few photo comparing some of the available the drawing modes:
Due to flash space constraint, some graphical features were removed. They include ellipse, triangle, line and dot drawing support. :(
We have 16kB of flash in total. Currently the bootloader and library takes 10kB, which is taking more space than the originally planned 8kB. It'd be even worse if these features were enabled. :(
Fortunately, it's still possible to draw those shapes by implementing the drawing function in the game itself.
I've already implemented the following features. However, these features deserve another blog post. I'll blog about them later.
I'll be working on the following stuffs:
That's it for now. I'll update you guys for any progress! :)
And I guess I'm going to take a short break from this project. I'm going to work on a piece of music!
Hey guys! The storage system of my portable game console is implemented!
It seems to be dumb to save the save content right inside the ROM file. I don't really have a choice because of the limitation of the FAT library. :(
My original idea was to have two files. One is the ROM file. Another is the save file. The save file is dynamically created by the game by using the API Calls.
However, when I tried to create the file by using the function pf_write() of the FAT library, it didn't work. Then I looked into the documentation and found out this restriction:
Alright. Then I had come up with three ideas. They're:
Using another FAT library takes a lot of work. Pre-creating a save file on the SD card would bring quite a bit of nuisance to the player because the player would have to manually paste the save file to the SD card in addition of the ROM file. So it's apparently to me that storing the save file content right inside the ROM would be the solution to go.
Since the restriction of the file-writing function is "Cannot create file. Only existing file can be written", everything should be working after saving the content right inside the ROM, right?
It turned out that I was mistaken. When I tried writing something on the SD card, the offset of the content being written was wrong! And some of the content were corrupted by zeros. Why?
After reading the documentation again, I've found out why. The library has a function for reading from file, and another function for writing to file. The function for reading works with any file offset. However, the function for writing only works properly if the seek offset of the file is aligned to 512 bytes. Otherwise, the offset would be rounded down to the closest 512-bytes. In addition of that, the number of bytes written are padded with zeros to 512 bytes.
The solution? Simple! Just align the offset of each resources to 512 bytes and pad them.
Here's the file format of the ROM of the game console.
Offset      Size    Description
0           3       Magic number
3           1       ROM file format version
4           32      Name of the game. NULL-terminated.
36          32      Author of the game. NULL-terminated.
68          256     Game Description. NULL-terminated.
324         700     Reserved
1024+8*N    4       Resource offset in file. N is from 0~255.
1024+8*N+4  4       Resource length. N is from 0~255. Can be zero.
3072        varies  The content of the resources. Each resources are aligned to 512 bytes.
The python script takes a CSV input file and generate the ROM. The CSV file looks like this:
NAME,Name of the game goes here
AUTHOR,Sadale.net
DESCRIPTION,Description of the game goes here
0,assets/game.bin
1,assets/level1.map
2,assets/level2.map
128,assets/titleScreen.graphic
254,[1024]
It's rather obvious what does the CSV do except the last line. For the resource #254, it allocates a resource that contains 1024 bytes of zero. It's useful for allocating space for save file of the game.
It's simple. There're only three functions.
It's rather intuitive. I guess I don't need to explain it here. :P
To demonstrate that the storage system is working, I've developed a test program. The program is capable for playing three kind of sound with configurable duty cycle. The function of the buttons are shown below:
Click here and see how does the code of the program looks like. Please notice that this isn't a complete project and it's not buildable without extif.h, which I'm not releasing until the completion of the software.
After saving the content of the file, here's how does the content of the ROM looks like:

As you can see above, the first byte 0x55 is the magic number. It's used for informing the program that the save data is valid.
The second one is the sound ID. The value of 0x01 refers to the second sound.
The third one is duty cycle. A value of 0x01 refers to 50% duty cycle.
After relaunching the program, the sound and the duty cycle will be loaded. I've tested it. The sound was played correctly after I pressed the Button A. :)
I'll be working on the following stuffs:
That's it for now. I'll update you guys for any progress! :)

If you know me personally, you'd probably heard of this portable game console. I have been working on this project for almost two months! I decided not to blog about this until now because I wasn't confident about the completion of this project. My main concern was the hardware design of my portable game console isn't going to work at all. Now that I've tested and proven that it's possible to do whatever I need to for this project. Therefore, it's now the right time to announce this project in this blog! :)
Introducing Portable Game Console Project! It is a minimalist, low-cost portable game console. It isn't an emulator of existing game console. It's a brand new game console system. It doesn't have a name yet. Until it's getting named, I'll just call it portable game console.
It's mostly a "because I can" project. I aim to learn stuffs from this project, including drawing PCB board, electronic design, a little bit mechanic design by drawing the case of the console, embedded programming, etc.
This is an open source project. There're already many existing game consoles. I don't think anyone would be interested in getting this one. Commercialization is out of the question. Instead, upon the completion of this project, I plan to do free giveaway of this console (and hopefully someone would be interested in developing games for this console). Waste all of the time! Lose all of the money! Hooray! :P
I haven't drawn a schematic diagram. So I'd just write down the wiring of STM32F030F4P6 to other hardware here. It's enough for anyone to reconstruct the circuit
Here's how the connection looks like on the prototype hardware:

I've never used most of these tools and software before this project.
STM32F030F4P6 is the microcontroller of this portable game console. It's a low-end ARM Cortex-M0 microcontroller.
It has 4kB of RAM and 16kB of Flash. In our design, the flash memory is split into two parts. The first part is the bootloader. The second part is the application (game). The bootloader contains the implementation of the API for accessing the LCD, sound system, buttons and SD card. The game is a playable that calls those API functions to access the hardware function of the game console.
The RAM is also split into two parts. A small part is exclusively used by the API. The other part is available for the application.
In addition to that, the bootloader will show a menu for the user to pick a game stored in the SD card. When the game is chosen, self-flashing will be performed to the application part of the flash memory. Then the BX instruction will be called to set the program counter to the starting point of the application, which will caused the game to be launched. There's, unfortunately, no protection of access. Although there's no API for that, it's technically possible for the application to, says, implement their own function to erase the SD card.
The bootloader will probably take 8kB of flash and very small amount of RAM (like 100 bytes).
The API call can be made by using a software interrupt. There's a fixed-address, 8-bytes storage inside the RAM. The API can be accessed by the application by first manipulating the content of the RAM of that address, then trigger a software interrupt. The interrupt EXTI line 15 is used for software interrupt. This design is inspired by int 80h of unix kernel.
Three functions are available:
keysSetDebouncePeriod() is used for setting the software debounce period. The longer it is, the slower the reaction time, and less noisy the response is.
For keysGetPressedState() and keysGetJustChangedState(), each bit represent the state of a button.
For keysGetPressedState(), pressed button would have its bit set to 1. The non-pressed one would be 0.
For keysGetJustChangedState(), pressed button that had changed would have its bit set to 1. Otherwise 0. For example, if the keysGetJustChangedState() of a button is 1, and the keysGetPressedState() is 0, that implies that the button was just released. After calling this function, the justChanged state of all buttons would reset to zero.
The sound system consists of two identical 1-bit synthesizer. One of them is for sound effect (foreground), another of them is for background music. Only one of them can output sound at one time. Depending on the configuration, it's possible to pause the background music while the sound effect is being played, or have the sound effect played during its effective duration, replacing the part of background music.
The sound synth has the following capability:
In addition, a musical playback format is defined for this game console, which enables the application to play music by calling an API function.
Piano uses a 12-suboctave scale, which means that each octave is divided by 12 notes.
However, in this game console, a 32-suboctave frequency scale is used instead. It means that each octave is divided by 32 notes. This game console is able to generate more fine frequency compared with piano, mainly useful for sounds effects. Since 32 isn't divisible by 12, some of the piano notes has to be substituted with a close enough frequency. Fortunately, this is not a problem because "Humans can notice a difference in pitch of about 5 to 6 cents" according to a paper by Beatus Dominik Loeffler. For a 32-suboctave system, the maximum error compared with piano note would be 64-suboctave, which is 1/64*100=1.5625 cent of error, which is far less than 5~6 cents. I've also personally listened to a piece of music played on the game console. It sounds good. So the frequency error isn't a problem. :)
During frequency sweeping, the 32-suboctave is further subdivided into 16 frequencies, forming 512-suboctaves. Each step of sweep would increase/decrease the frequency by a 512-suboctave until the final frequency is reached.
The frequency of the sound to be played is 2^(5+n/32) Hz, where n can be any value from 0 to 255.
Generation of tone requires vibration of audio signal. For a 1-bit synth, the duty cycle determines the duration of the signal to be LOW or HIGH. Let's take a 1000Hz sound wave as an example. It takes 1ms to complete a period. If the duty cycle is 50%, 0.5ms would be spent on LOW, and another 0.5ms would be spent on HIGH. If the duty cycle is 75%, the signal would be LOW for 0.25ms, and HIGH for 0.75ms.
Although this synth is 1-bit synth, it's possible to control the volume of the synth by using duty cycle. That's because the duty cycle affects the RMS value of the waveform. The closer the duty cycle to 50%, the louder the sound is.
The duty cycle can be adjusted (1-1/(n^2)) * 100%, where n can be any value from 0 to 15.
Unlike frequency, the duty cycle sweep does not have any subdivide mechanism.
The format is simple. It's a mix of command and data. Data starts with a non-zero byte. Command starts with a byte of zero. It has 6 modes. They are STOP, DF, DCF, FULL, FULL->DF, FULL->DCF.
To switch mode, set the first byte (duration) to 0, then set the second byte to the command ID. The command ID for STOP is 0, DF is 1 and so on. Here's an example of a piece of music:
uint8_t musicArray[] = {
0, 4,  //Switch to FULL->DF mode
20, 97, 97, 0, 0x11, 0, SYNTH_FREQ_SWEEP_TRIANGLE|SYNTH_DUTY_SWEEP_REPEAT_ENABLE, //Play a sound with full parameters specification and switch to DF mode
20,102, //Now that we're in DF (duration+frequency) mode. We play a sound in DF mode
65,105, //Play another sound in DF mode
20,97, //ditto
20,105, //ditto
45,102, //ditto
100,97, //ditto
0, 0 //Switch to STOP mode. It's like a NULL character for string.
};
The following functions are available:
Here's a piece of recorded music generated with the game console by using the music format:
I'll continue be developing this game console. It'll probably be completed some time in 2019. I'll update you guys about any progress! :)