The graphic system of the portable game console project is implemented! In addition, the clock control and power saving stuffs are also implemented. This blog post focus on Graphic System. I'll save other stuffs for my next blog post.
Graphic System Design
- 84*48 monochrome. Each byte is 8 pixel grouped vertically.
- Capability of drawing bitmap, rectangle and text
- Rectangle: Supports both filled rectangle and hollow rectangle
- Text: Supports specification of width, height and word wrap
- Drawing mechanism:
- First, The background bounding rectangle is drawn.
- Then, the item itself is drawn
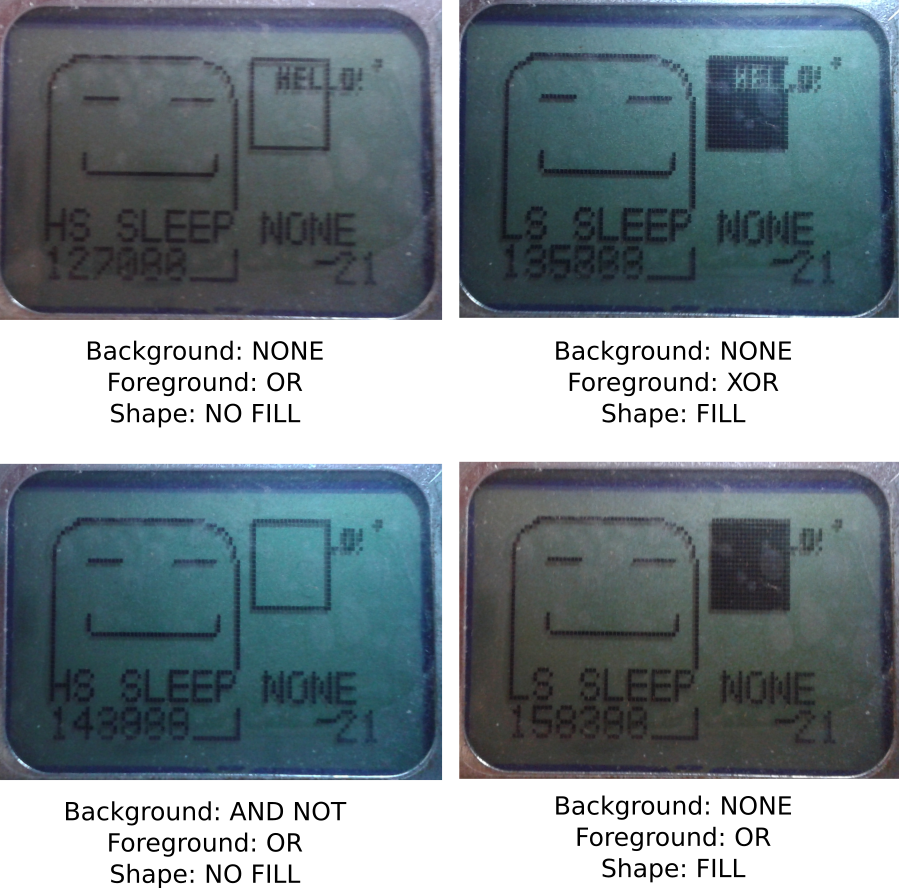
- When they're being drawn, four modes can be selected. They are:
- NONE: pixel = originalPixelGroup
- AND NOT: pixel = originalPixelGroup&(~newPixelGroup)
- OR: pixel = originalPixelGroup|newPixelGroup
- XOR: pixel = originalPixeGroupl^newPixelGroup
- Example: Drawing opaque item would be (BACKGROUND_AND_NOT|FOREGROUND_OR)
- Example: Drawing transparent item would be (BACKGROUND_NONE|FOREGROUND_OR)
- DMA is used for transferring the image from buffer to the LCD display via SPI
- This allows the transfer operation to be done while the microcontroller is in sleep mode, saving power consumption.
- Double buffering support
- However, each buffer takes 504 bytes. With a total of 4kB of RAM, it may not be wise to do double-buffering
API Calls Listing
- extern void graphicClearDisplay(bool inverted);
- extern void graphicDrawText(const struct GraphicText *text, int8_t x, int8_t y, uint8_t mode);
- extern void graphicDrawImage(const struct GraphicImage *image, int8_t x, int8_t y, uint8_t mode); //Can also draw rectangle with a special pointer address
- extern void graphicLoadImage(const void buf, struct GraphicImage image); //converts binary from game console bitmap format to the struct GraphicImage
- extern void graphicSetDrawBuffer(void *buf);
- extern void graphicSetDisplayMode(enum GraphicDisplayMode displayMode); //Set inverted display and stuffs
- extern bool graphicDisplay(const void *buf);
- extern bool graphicIsDisplayReady(void);
- Structs:
- GraphicImage: void *image; uint8_t width; uint8_t height;
- GraphicText: char *text; uint16_t length; uint8_t width; uint8_t height;
Typical Procedure of Using Graphic System
Double buffering isn't used in this procedure:
- Wait for the completion of the previous DMA transfer process. Function: graphicIsDisplayReady()
- Set a graphical buffer to have stuffs to be drawn to. Function: graphicDrawText(), graphicDrawImage()
- Clear the buffer to remove previously drawn image
- Draw stuffs to the buffer
- Start the DMA transfer process to transfer the buffer to the LCD. Then optionally enter sleep mode to save power
- Do not modify the buffer until the transfer is completed
Updated sample program
I've modified the sample program that I made for testing storage system, input system and synth system. Now that it's also capable for testing the new graphic system!
The updated sample program draws a lot of stuffs on the LCD, including a background image loaded from a resource in the ROM, a square, and system information like system tick, clock frequency and sleep mode.
In the updated sample program, the drawing mode of the square can be configured. Here's a few photo comparing some of the available the drawing modes:

Implemented but Removed Features
Due to flash space constraint, some graphical features were removed. They include ellipse, triangle, line and dot drawing support. :(
We have 16kB of flash in total. Currently the bootloader and library takes 10kB, which is taking more space than the originally planned 8kB. It'd be even worse if these features were enabled. :(
Fortunately, it's still possible to draw those shapes by implementing the drawing function in the game itself.
Other Progress to be Blogged in the Future
I've already implemented the following features. However, these features deserve another blog post. I'll blog about them later.
- Clock control and sleep mode
- Removal of EXTIF in favor of using existing function calling convention
What's next?
I'll be working on the following stuffs:
- Clean up on the code
- Sound System: Check if additive synth is possible
- Game selection menu
- LCD contrast adjustment
- Find out how to put code on the RAM.
That's it for now. I'll update you guys for any progress! :)
And I guess I'm going to take a short break from this project. I'm going to work on a piece of music!
